Britax Car Seat Installation
Congratulations to you as a new parent or first-time parent as you welcome your bundle of joy.
Now you have a new car seat for your baby’s first ride home, and maybe your choice brand was Britax. You now need to learn how to install a Britax car seat.
Just in time, at about the right place for your Britax car seat installation and guide, where the heavy lifting has been done for you. Every step and guide has been highlighted from the Britax car seat manual, which you can find on the Britax car seat expiration guide post – the car seat manual for every Britax car seat model are available for download there.
Basic Instructions Before Beginning Installation
Rear-facing only
- All Britax car seat models made for rear-facing mode must be used in such position for infants.
- All rear-facing infant seats should only be used for children weighing 4-35 lbs. and height less than 32 in. and whose head is 1 in. or more below the top of the car seat.
- The harness should not be used for children less than 11 lbs.
- The infant car seat must be secured to the car with a LATCH or a vehicle seat belt.
- Register the car seat with the manufacturer.
- Do not install a rear-facing car seat in the front passenger seat with an activated airbag. The safest place for a car seat is the center rear spot.
How to Install Britax Car Seat Base – Installation with the Base
You can decide to install your Britax car seat with or without the base. While learning both is important, it is noteworthy that installing infant seat without base comes as a necessity when you have to switch cars often or use a taxi. Most States’ car seat laws require using the appropriate child restraint system when you board a taxi.
Britax Car Seat Base Installation goes as follows:
- Check that your vehicle seat belt is compatible with the infant car seat (check the appropriate page in your Britax car seat manual of the model you have).
- Ensure the car seat base is lying completely flat on your vehicle’s seat, depending on the seat position/location you choose. If not, choose another position for the installation.
- Check that the incline angle is correct by adjusting with the adjustment lever until you achieve a perfect recline angle (red marker completely visible between the two lines on the recline angle indicator).

Using the LATCH/LUAS/ISOFIX System:
- Choose your desired car seat location in your car.
- Make sure the infant seat remains in a rear-facing position.
- Get the car seat base and place it on your chosen spot.
- Pull out the lower anchor connectors from the storage on the side of the car seat base.
- Lengthen the connector straps to what can reach the anchorage system on the vehicle seat.
- Press the anchor connectors into the vehicle seat anchorage system until you hear a ‘click’ sound.
- Confirm that the seat base is well secured by pulling the anchor connectors (it should be firm).
- To ensure the seat base is secured, press onto the center of the base into the seat and pull the connector straps until they are tight. (the base should only move less than 1 inch when pushed front-to-back or side-to-side).
- Any excess strap length should be pushed back into the base.
- Ensure the recline angle is correct (the red marker is completely visible between the two lines on the recline angle indicator).
Video guide:
Uninstalling the Base – LATCH/LUAS/ISOFIX System:
- You press the lower anchor connector release button on the top of the car seat base to loosen the connector straps.
- Press each red release button on the lower anchor connectors to release the vehicle anchors.
- Return the lower anchor connectors into the storage on the side of the car seat base.
Using the Seat Belt:
- Choose your desired car seat location in your car.
- Make sure the infant seat remains in a rear-facing position.
- Get the car seat base and place it on your chosen spot.
- Then pass the seat belt through the belt path on the seat base and connect it to the buckle socket.
- Ensure the seat belt and the buckle socket are not twisted.
- To ensure the seat base is secured, press onto the center of the base into the seat and pull all the seat belt slacks till the belt is tight (the base should only move less than 1 inch when pushed front-to-back or side-to-side).
- Ensure the recline angle is correct (the red marker is completely visible between the two lines on the recline angle indicator).
Uninstalling the Base – Seat Belt:
- Unbuckle the seat belt from the buckle socket and pull out through the belt path on the seat base.
Attaching the Infant Car Seat to the Installed Base:
- Ensure the infant seat base has been securely installed.
- Now place the infant car seat into the installed base and press down until a ‘click’ sound is heard.
- Check that the infant seat is secured to the base by pulling up the seat.
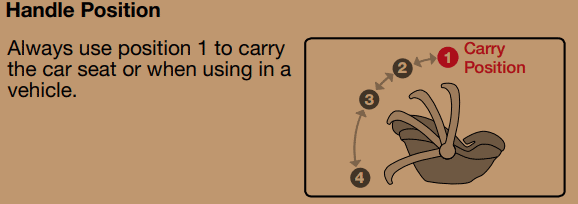
- Also, ensure that the handle is locked in position 1 as in the image below and that the recline angle is still correct;
How To Remove the Infant Car Seat from the Installed Base:
- You pull and hold the release lever on the back of the infant car seat.
- Then lift the infant seat from the base.
How to Install Britax Car Seat Without Base – Installation without the Base
You will need this knowledge when you have to use your Britax car seat without the base, say in a taxi or cab, or when you have to switch cars, or maybe you prefer without the base; however, it is not illegal.
Before carrying out the Britax car seat installation without the base, here are a few guidelines to follow;
- Make sure to secure your child in the infant seat before installing the seat in the vehicle.
- Check that your vehicle seat belt is compatible with the infant car seat model (refer to your vehicle owner’s manual).
- Check that the incline angle is correct by adjusting with the adjustment lever until you achieve a perfect recline angle.
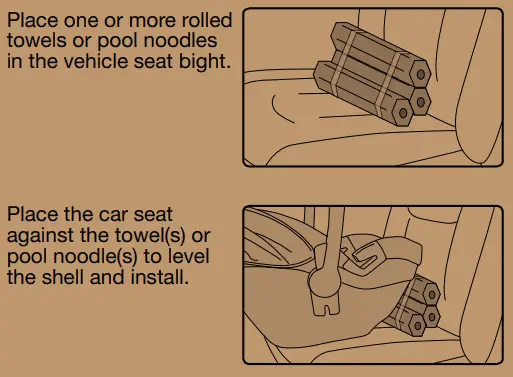
- If the car seat is not in a proper recline angle after installation, you can try another seat position in your vehicle or place one or more rolled towels in the vehicle seat blight as seen in the image below;
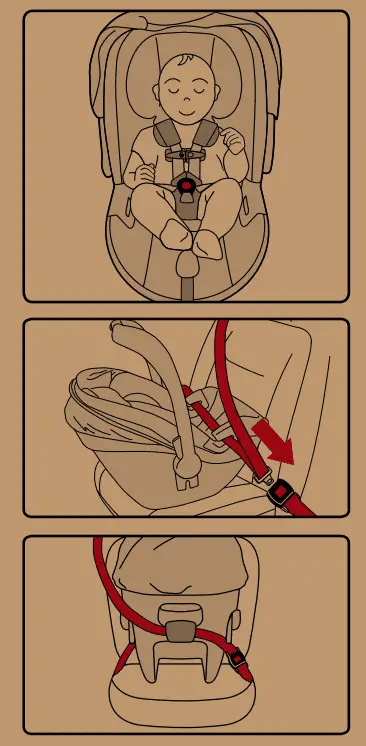
Britax Car Seat Straps Instructions – Using the lap-shoulder Belt:
- Secure your child in the infant seat before installing the seat in the vehicle.
- Maintain the infant car seat position as required for the child’s age (rear-facing or forward-facing).
- Pull out the vehicle seat belt and pass only the lap part through the infant seat belt path and buckle to the socket.
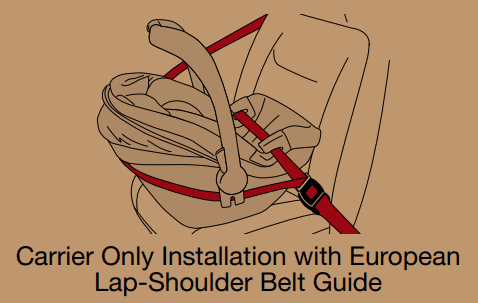
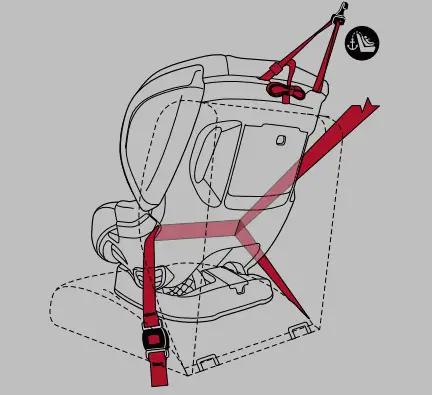
- Then wrap the shoulder part around the car seat shell. – European Belt Guide (non-Europeans can ignore this step)
- Ensure the vehicle seat belt system is locked according to the vehicle’s owner manual and that the belts are not twisted.
- Remove all slacks from the lap and shoulder belts by firmly pushing down the infant car seat into the vehicle seat.
- Double-check that the car seat is well secured (the infant car seat should only move less than 1 inch when pushed front-to-back or side-to-side).
Britax Car Seat Straps Instructions – Using the Lap Belt:
- Secure your child in the infant seat before installing the seat in the vehicle.
- Maintain the infant car seat position as required for the child’s age (rear-facing or forward-facing).
- Pull out the vehicle seat belt and pass the lap belt through the infant seat belt path and buckle it to the socket.
- Ensure the vehicle seat belt system is locked according to the vehicle’s owner manual and that the belt is not twisted.
- Remove all slacks from the lap and shoulder belts by firmly pushing down the infant car seat into the vehicle seat.
How to Install Britax Car Seat – Convertible Car Seats & All-In-One Car Seat
While we just looked at how to install rear-facing-only Britax car seats, here will cover convertibles and all-in-ones such as the Britax Boulevard Clicktight, Britax Advocate Clicktight, and the Britax Marathon Clicktight in both the rear-facing and forward-facing modes.
All Britax car seat manuals for all models of convertibles and all-in-ones can be found on the Britax car seat expiration guide and are available for download there.
Basic Instructions Before Beginning Installation
Convertible Car Seats & All-In-One Car Seats
- Convertibles in the rear-facing mode should be used for children weighing 5-40 lbs, with a height of less than 49 in. and whose head is 1 in. or more below the top of the car seat.
- Convertibles in the forward-facing mode should be used for children weighing 22-65 lbs. and height less than 49 in. and can walk unassisted and whose top of the ears are below the top of the car seat.
- All-in-One car seats in the rear-facing and forward-facing modes should follow the above weight and height guidelines.
- All-in-One in the Harness mode should be used for children weighing 5-65 lbs. and height less than 49 in.
- All-in-One in booster mode should be used for children weighing 40-120 lbs. and height 44-63 in.
- Register the car seat with the manufacturer.
- For Boulevard ClickTight convertible car seat, the car seat should not be installed with the lower anchors for a child weighing above 35 lbs. in the rear-facing mode or 40 lbs. in the forward-facing mode.
- For Advocate ClickTight convertible car seat specifically, the car seat should not be installed with the lower anchors for a child weighing above 30 lbs. in the rear-facing mode or 35 lbs. in the forward-facing mode.
- Ensure you prevent the Side Impact Cushions from being punctured for the Advocate ClickTight convertible car seat.
- Cover the child seat when the vehicle is parked under direct sunlight. Hot metal parts could burn the skin.
How to Install Britax Advocate/Boulevard ClickTight Rear Facing
Installation with the Lap-Shoulder Belt
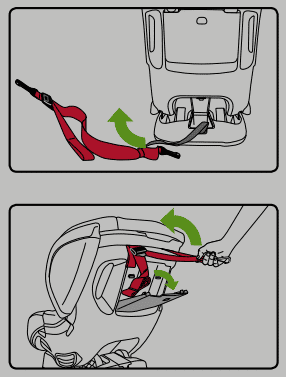
- Open the ClickTight by pressing the dimple on the ClickTight dial and then rotate the dial in a clockwise direction till the ClickTight releases and lifts to open.
- Attach each end of the anti-rebound bar to the structure tube of the ClickTight.
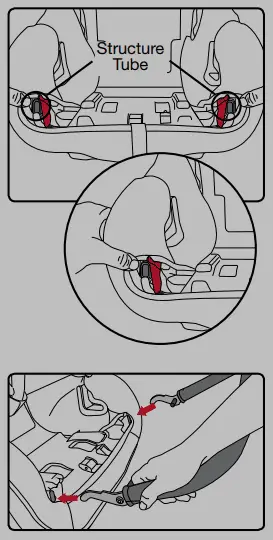
3. Lift the anti-rebound bar to ensure both ends are correctly fitted in the structure tubes.
4. Recline the child seat to the rear-facing mode.
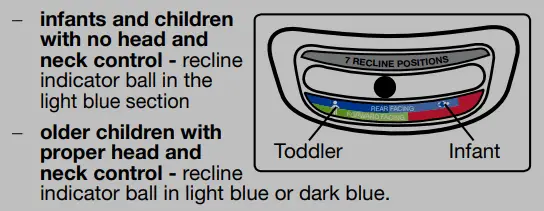
5. To recline the seat, pull the recline handle and then rotate the seat until the recline indicator ball is in the correct position.
6. Release the recline handle and confirm that the child seat is locked to the correct position.
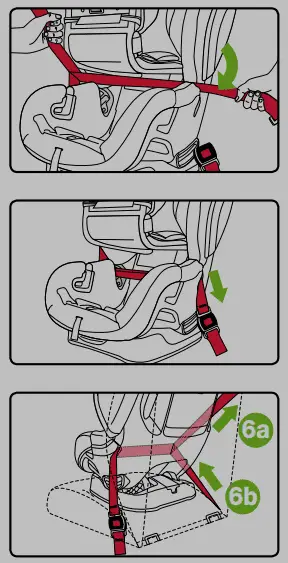
7. Now, slide the vehicle seat belt (shoulder and lap parts) through the seat belt path of the child seat and then connect it to the buckle socket.
8. Check that the vehicle seat belt is not twisted.
9. Remove all slacks from the lap belt (a), then the shoulder belt (b). by pushing down into the middle of the seat and tightening the vehicle belt.
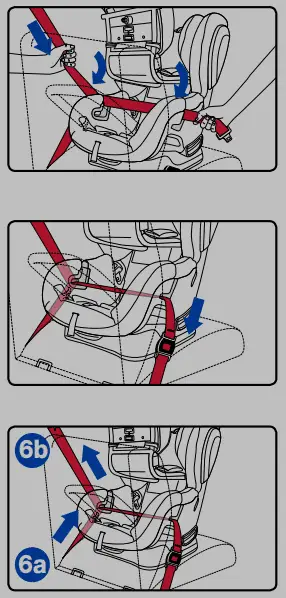
10. Hold the harness straps away from the seat while closing the ClickTight. A ‘click’ sound confirms that the ClickTight is secure.
11. Double-check that the car seat is well secured (the child seat should only move less than 1 inch when pushed front-to-back or side-to-side).
This video will further guide you
Installation Using the LATCH/LUAS/ISOFIX System
- Do not install the Advocate ClickTight convertible car seat for a child weighing more than 30 lbs. in the rear-facing mode.
- Do not install the Boulevard ClickTight convertible car seat for a child weighing more than 35 lbs. in the rear-facing mode.
- Open the ClickTight by pressing the dimple on the ClickTight dial and then rotate the dial in a clockwise direction till the ClickTight releases and lifts to open.
- Attach each end of the anti-rebound bar to the structure tube of the ClickTight.

- Lift the anti-rebound bar to ensure both ends are correctly fitted in the structure tubes.
- Recline the child seat to the rear-facing mode.
- To recline the seat, pull the recline handle and then rotate the seat until the recline indicator ball is in the correct position.
- Release the recline handle and confirm that the child seat is locked to the correct position.
Video guide below:
Britax Advocate/Boulevard ClickTight Installation Forward Facing
Installation with the Lap-Shoulder Belt
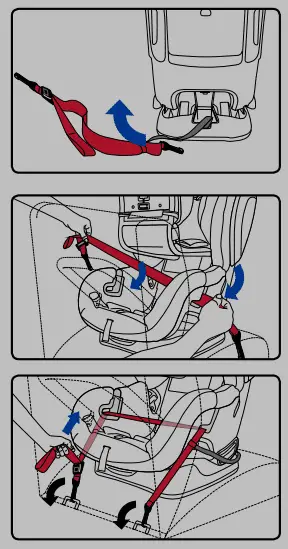
- The anti-rebound bar must be removed when installing in the forward-position mode.
- Remove the tether from the tether storage on the child seat and place it above the back of the child seat.
- Place the child seat in a forward-facing mode in an upright position and ensure that the seat’s base is flat on the vehicle seat.
- Open the ClickTight by pressing the dimple on the ClickTight dial and then rotate the dial in a clockwise direction till the ClickTight releases and lifts to open.
- Now, slide the vehicle seat belt (shoulder and lap parts) through the seat belt path of the forward-facing seat and then connect it to the buckle socket.
- Check that the vehicle seat belt is not twisted.
Installation Using the LATCH/LUAS/ISOFIX System
- Pull out the lower anchor connectors from the storage on the rear of the car seat and pull the straps to full length towards the child’s left-hand side.

Video guide:
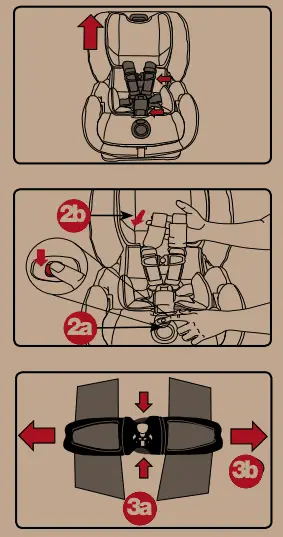
Harness Height Adjustment
- When the child seat is in the rear-facing position, the harness straps should be placed in the closest position at or below a child’s shoulders.
- When the child seat is in the forward-facing mode, the harness straps should be placed in the closest position at or above a child’s shoulders.
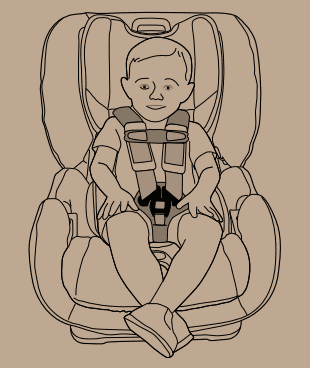
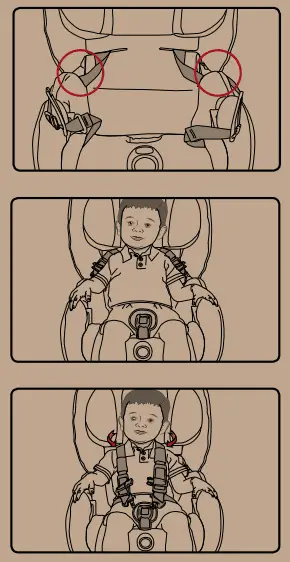
How to Secure Your Child in a Car Seat After Installation
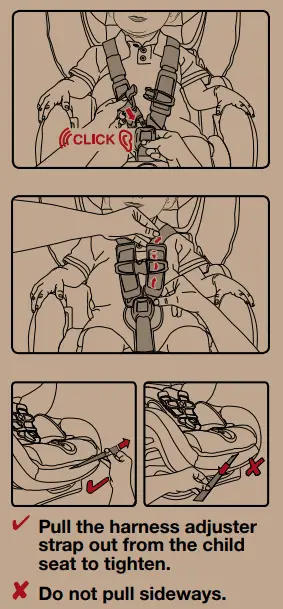
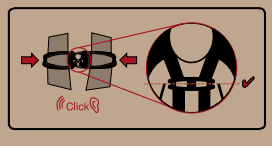
- Make sure to adjust the harness and the buckle correctly.
- Loosen the harness by pressing the harness release button (a), and pulling both harness straps forward (b).