Cosco Car Seat Installation
Welcome onboard to motherhood and parenthood. It is a thing of joy to bear your bundle of joy in your hands.
Giving them the best of safety comes as a priority, and that is why having a car seat for a newborn is one of the first checklists before you are allowed to be discharged from the hospital.
Learning how to install a car seat is easy peasy like ABC. Cosco car seat installation is as simple as every other brand, and I have covered the following brands’ installation processes:
Evenflo car seat installation;
Safety 1st car seat installation.
Cosco car seat manual for all models can be found here on when Cosco car seat expiration.
Basic Instructions Before Beginning Cosco Car Seat Installation
- You should register your new car seat so you can be reached in the event of a recall. You can register online at
https://www.coscokids.com/registration/
- Cosco requires that a car seat in the rear-facing position be installed for children weighing 5-40 lbs. and whose height is 19-40 in.
- While in a forward-facing position, the seat should be installed for children weighing 22-40 lbs. and height 29-43 in. and at least 1 year old.
Before beginning your new Cosco car seat installation, here are some steps to take to prepare the car seat to fit your child;
- Fully loosen the harness straps by pushing down on the harness release lever under the flap on the front seat pad while pulling out the straps.
- Unbuckle the harness – press the top of the red button and pull the buckle tongues out.
- Release the chest clip – now press the chest clip release button and apart.
- You can now place your child in the car seat to adjust the harness to fit correctly. Ensure your child’s bottom and back is flat against the car set while adjusting the harness.
- Ensure that the buckle position is always on the slot closest to your child. You should start in the 1st slot and adjust outwards as your child grows.
- Ensure the harness strap is always positioned closest to your child’s shoulder height. The harness strap MUST be at or slightly below the shoulders.
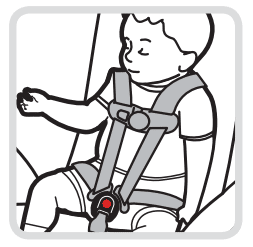
Securing Your Child in The Car Seat After Installation
- Place your child in the car seat.
- Buckle the harness
- Close the chest clip by inserting half of the chest clip into the second half and snapping it together
- Then tighten the harness by pulling on the harness adjustment strap.
- Position the chest clip at the mid-chest of your child and away from their neck.
- Check and ensure that the harness is tight.
How to Install Cosco Car Seat Base
Using LATCH/LUAS/ISOFIX
- Pull out the lower anchor belt from the storage compartment.
- Pass the belt through the car seat base belt path. Do not twist the belt.
- Place the car seat base on the vehicle’s back seat in rear-facing.
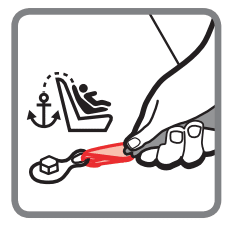
- Attach the lower anchor hooks to the vehicle’s lower anchors.
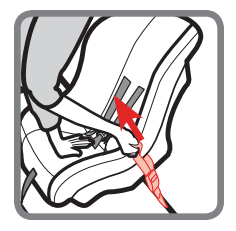
- Tighten the belt by firmly pushing down the base towards the back against the vehicle seat back while pulling the free end of the strap to tighten.
- Check that the belt is tight by holding the base with your ‘weakest’ hand and pushing and pulling the base from side to side (the car seat base should not move more than 1 inch when pushed front-to-back or side-to-side).
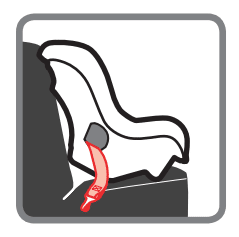
- Attach the car seat to the seat base.
- Check the level line to ensure it is parallel to the ground.
Using Vehicle Belt (Lap or Lap/Shoulder Belt)
- If you had previously used the lower anchor belt, store it back in its storage compartment.
- Place the car seat base on the vehicle’s back seat in rear-facing.
- Confirm that your vehicle seat belt is compatible with the Cosco car seat base.
- Pass the vehicle belt through the base belt path.
- Buckle the belt.
- Tighten the belt by firmly pushing the base down and back towards the vehicle seatback while pulling the free end of the strap to tighten.
- Ensure the belt is tight by holding the base at the belt path with your ‘weakest’ hand and pushing and pulling from side to side (the car seat base should not move more than 1 inch when pushed front-to-back or side-to-side).
- Attach the car seat to the seat base.
- Check the level line to ensure it is parallel to the ground.
Cosco Car Seat Installation Rear Facing without Base
There are some basic instructions to always note when installing a car seat in the rear-facing position using the LATCH/LUAS/ISOFIX system or the vehicle seat belt.
- Never install a rear-facing car seat in the front passenger seat when the airbag is installed. The rear seat is the best location for an infant seat, and the center rear is the safest spot.
- Cosco recommends that a rear-facing car seat MUST be used for an infant less than 1-year-old.
- Do not use the LATCH/LUAS/ISOFIX system along with the vehicle lap or lap-shoulder belt.
- Ensure to check the lower anchor belt before installation and only use the belt if it can be tightened properly and securely.
- Do not fasten more than one lower anchor hook to the same lower anchor bar in a vehicle.
- Ensure to secure the tether hook tightly when installing it in the rear-facing position.
Using the LATCH/LUAS/ISOFIX System
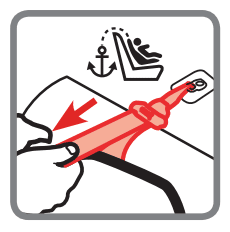
- Pull out the lower anchor strap from the storage compartment and ensure both hooks are out on the same side of the car seat as shown;

- Pass the lower anchor strap through the rear-facing belt path.
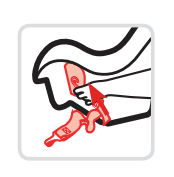
- Pull the hook from under the pad across to the opposite side. You MUST use either the 1st or 2nd buckle slot, and do not place the belt over your child’s legs.
- Place the rear-facing car seat in your chosen spot on the vehicle’s rear seat.
- Check the level line to ensure the car seat is positioned correctly. The level line MUST be parallel with the ground for children who cannot sit up unassisted. While for children who can sit up unaided, you may rotate the car seat to be more upright.
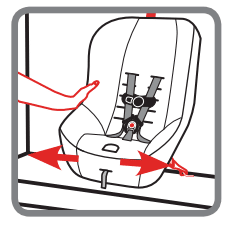
- Attach the lower anchor hooks to the vehicle’s lower anchors and then tighten the belt.
- To ensure the seat and the belt are secured tightly, press firmly into the center of the seat while pulling the seat belt slacks till the belt is tightened (the car seat should only move less than 1 inch when pushed front-to-back or side-to-side).
- Secure your child in the car seat.
Video guide – Rear Facing Installation With LATCH
Using the Vehicle Seat Belt (Lap or Lap/Shoulder Belt)
- Place the Cosco car seat in a rear-facing position in the back seat.
- Check the level line to ensure the car seat is positioned correctly. The level line MUST be parallel with the ground for children who cannot sit up unassisted. While for children who can sit up unaided, you may rotate the car seat to be more upright.
- Confirm that your vehicle seat belt is compatible with the Cosco car seat.
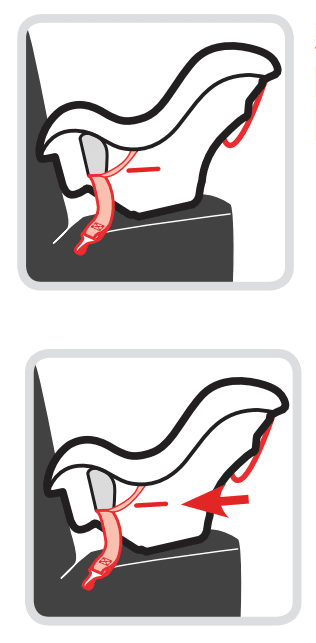
- Pass the vehicle lap or lap/shoulder belt through the rear-facing belt path.
- Reach under the pad and pull the belt across the shell. Ensure the belt is in front of the buckle strap and use either the 1st or 2nd buckle slot.
- Buckle and tighten the belt.
- To ensure the seat and the belt are secured tightly, press firmly into the center of the seat while pulling the vehicle seat belt till it is tightened (the car seat should only move less than 1 inch when pushed front-to-back or side-to-side).
Video guide – Rear Facing Installation With Vehicle Belt
Cosco Car Seat Installation Front Facing
Before beginning your Cosco car seat installation in a forward-facing position, you should ensure to follow the following basic instructions:
- Cosco recommends that a forward-facing car seat MUST be used for a child at least 1 year old.
- A forward-facing car seat should be installed for children weighing 22-40 lbs. height 29-43 in., and at least 1 year old.
- The LATCH/LUAS/ISOFIX system, lap belt with tether, or lap/shoulder belt with tether can be used for a forward-facing installation.
- Do not fasten more than one lower anchor hook to the same lower anchor bar in a vehicle.
- Do not use the LATCH/LUAS/ISOFIX system along with the vehicle lap or lap-shoulder belt.
Using the LATCH/LUAS/ISOFIX System
- Pull out the lower anchor strap from the storage compartment, remove the strap from the rear-facing belt path and ensure both hooks are out on the same side of the car seat as shown;
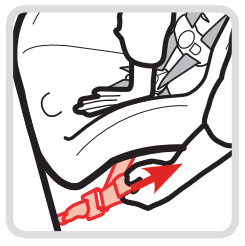
- Pass the lower anchor strap through the forward-facing belt path.
- Place the forward-facing car seat in your chosen spot on the vehicle’s rear seat.
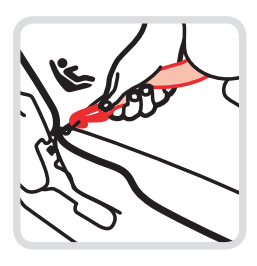
- Loosely attach the tether hook. Location varies from car to car. Check with your vehicle owner’s manual for a specific location.
- Then attach the lower anchor hooks to the vehicle’s lower anchors. Also, check with the manual for the location.
- Tighten the lower anchor strap by firmly pushing down the car seat while pulling the end of the belt to tighten.
- Tighten the tether by firmly pushing on the back of the seat and pulling the tether strap to remove all the slack and create tension on the strap.
- To ensure the seat and the strap are secured tightly, hold the car seat at the belt path with your “weakest” hand and push and pull from side to side (the car seat should only move less than 1 inch when pushed front-to-back or side-to-side).
Using the Vehicle Seat Belt
- Place the car seat in a forward-facing position in the back seat against the vehicle seat back.
- Loosely attach the tether hook. Location varies from car to car. Check with your vehicle owner’s manual for a specific location.
- Confirm that your vehicle seat belt is compatible with the Cosco car seat.
- Pass the vehicle lap or lap/shoulder belt through the forward-facing belt path.
- Buckle and tighten the vehicle seat belt.
- Tighten the tether by pushing firmly on the back of the seat and pulling the tether strap to remove all slack.
- To ensure the seat and belt are secured tightly, hold the car seat at the belt path with your “weakest” hand and push and pull from side to side (the car seat should only move less than 1 inch when pushed front-to-back or side-to-side).