Graco Car Seat Installation
Car seat installation is usually the next stage after deciding which car seat to buy for your newborn. And maybe you have already chosen the Graco brand; this guide will help you in installing your new car seat.
This guide is divided into 3 sections: Graco Infant car seat installation, convertible car seat installation, and booster seat installation.
However, if you are still interested in learning how to install other car seat brands, here are different pages on them already:
Safety 1st car seat installation.
Graco car seat manual for all models can be found here on Graco car seat expiration.
As detailed as this Graco car seat installation guide maybe, you’re still encouraged to access the car seat manufacturer’s guide for proper installation through the Graco car seat manual suitable for the model you have.
Basic Instructions Before Beginning Graco Car Seat Installation –
- You should register your new car seat either by the postcard attached to your car seat or online at https://www.gracobaby.com/s/gracobaby/support/carseat-registration
- Study your vehicle owner’s manual to know the recommended seating location for your car seat. Never install an infant seat in rear-facing in the front passenger seat. The center rear is the safest spot for a car seat.
- Decide whether to use the LATCH/LUAS/ISOFIX system or the vehicle seat belt. Both are equally safe to use.
- Do NOT use both the LATCH/LUAS/ISOFIX system and the vehicle seat belt at the same time.
- For additional resources or to check your installed car seat, or for help installing your car seat, you can visit the following recommended websites:
www.nhtsa.gov • www.seatcheck.org • www.safekids.org
Graco Infant Car Seat Installation
In the arsenal of the Graco infant car seats are the popular models like the SnugRide® series. However, the installation process is the same for the infant car seats.
On the other hand, Graco infant car seats are to be installed for infants and toddlers weighing 4-65 lbs. and a height of 35 in.
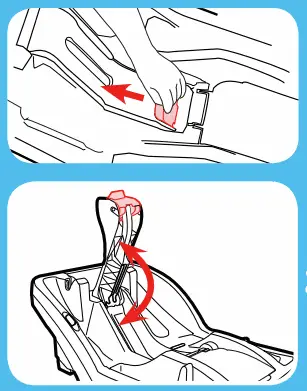
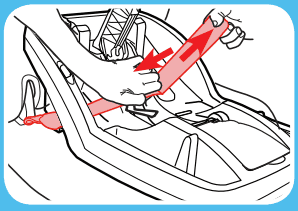
How to Remove Graco Car Seat from Base
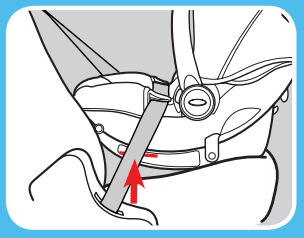
- Squeeze the base release handle from the back of the car seat and lift the car seat out of the base.
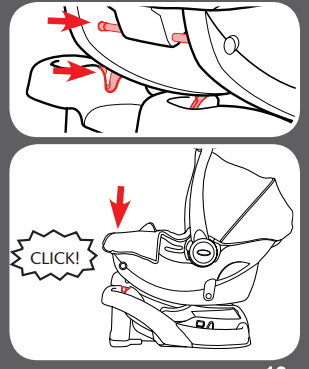
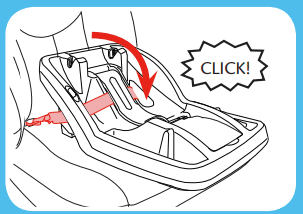
How to Attach Graco Car Seat to Base
Align the lock bar at the front of the car seat with the locks in the base.
- Set the car seat in the base and push down on the front of the car seat. You should hear a ‘click’ sound to confirm it is locked.
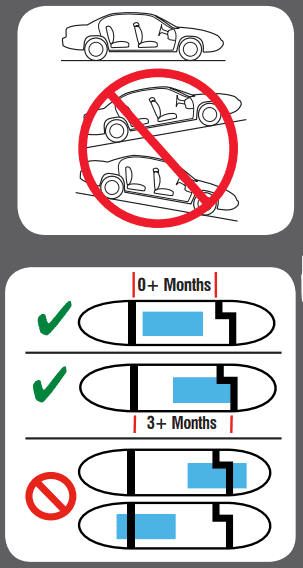
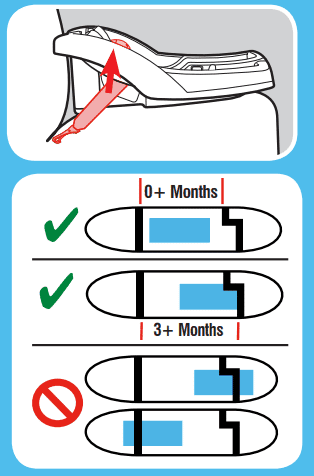
How to Read the Level Indicator
- Your vehicle should be parked on level ground.
- When the blue indicator is in the smaller area between the black lines, the car seat is leveled correctly for infants 0+ months.
- When the blue indicator is in the partially notched area, the car seat is leveled correctly for 3+ months infants.
- When the blue indicator appears outside the black lines, the car seat is NOT leveled correctly and should be adjusted properly.
Graco Car Seat Installation Rear Facing
Safe Use Checklist / Basic Instruction When Installing Rear-Facing
- In rear-facing car seat should be installed for infants and toddlers weighing 4-35 lbs. and height less than 32 in.
- Graco Infant car seat in rear-facing MUST be installed in the vehicle rear seat.
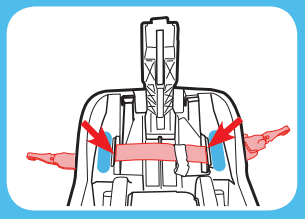
- Ensure the LATCH/LUAS/ISOFIX strap or the vehicle seat belt is passed through the rear-facing belt path.
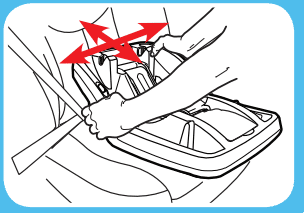
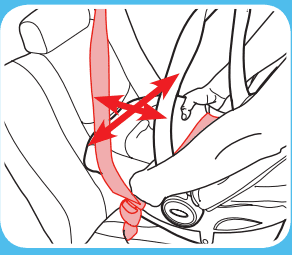
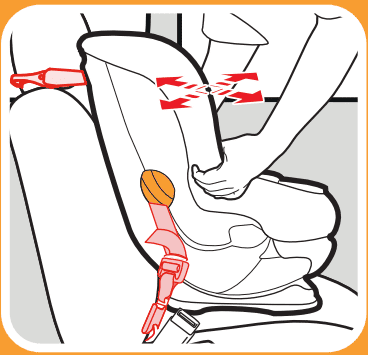
- Ensure the infant car seat is securely installed. To ensure the infant car seat is tightly installed, the car seat should not move more than 1 inch when pushed or pulled side-to-side or front-to-back.
- Ensure the level indicator is in the correct recline.
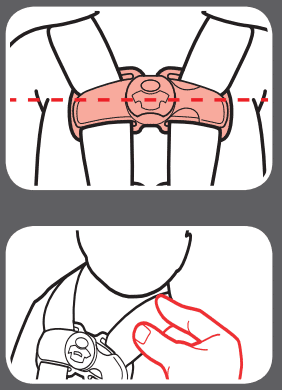
- Ensure the harness straps are at or just below the top of your child’s shoulders and that the chest clip is at the armpit level.
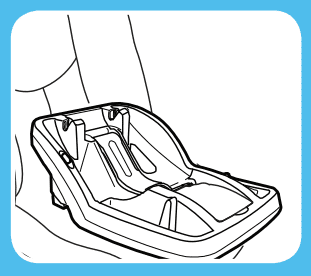
Graco Car Seat Base Installation
How to Install Graco Car Seat Base Using LATCH in Rear-Facing
- Place the Graco car seat base in the back seat of your vehicle in between the lower LATCH anchors.
- Ensure the base is flat on the vehicle seat, then push it back until the front of the base touches the vehicle seat back.
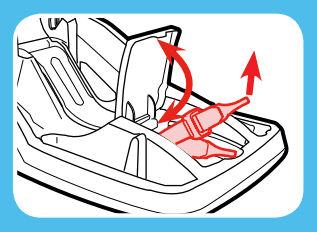
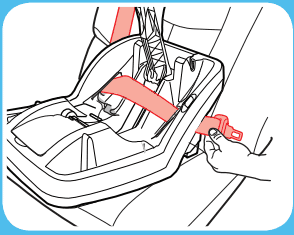
- Pull out the LATCH hooks from the storage compartment.
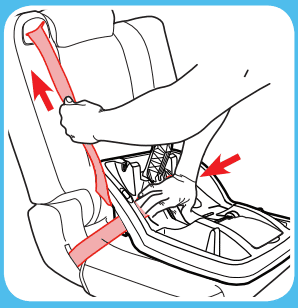
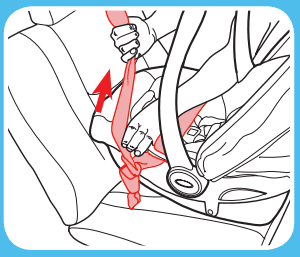
How to Install Graco Car Seat Base Using Vehicle Seat Belt in Rear-Facing
- Ensure the LATCH strap is stored back in the storage compartment.
- Place the Graco car seat base in the back seat of your vehicle in rear-facing.
- Ensure the base is flat on the vehicle seat, then push it back until the front of the base touches the vehicle seat back.
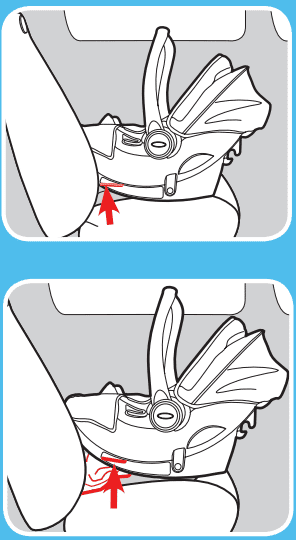
- Open the SnugLock™ arm by pushing in the release lever.
Video Guide: Graco Car Seat Installation – using Seat Belt
Graco Car Seat Installation Without Base
Installing a car seat without a base is quite straightforward, like installing one with a base. Also, note that it is legal, which is why car seat manufacturers teach how.
When transferring your infant seat to your partner’s vehicle or a taxi/cab, it comes in handy.
Some states’ car seat laws require that taxis comply with car seat laws, so it is important to use your car seat when boarding a taxi.
How to Install Graco Car Seat Without Base Using LATCH in Rear-Facing
- Put your child in the infant car seat and secure them.
- Place the car seat in the back seat in rear-facing.
- Push the infant seat towards the back until the front of the seat touches the vehicle seat back.
- Check the rear-facing level line on the side of the seat; the level line MUST be level with the ground.
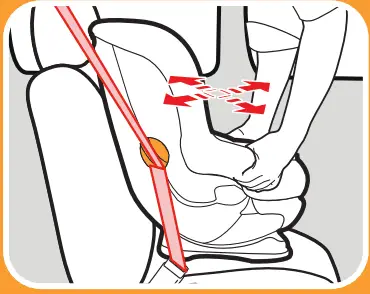
- Check to confirm that the infant seat is tightly installed. Grab the sides of the infant car seat by the belt path and push and pull from side to side and front-to-back. The infant seat should not move more than 1in on either side.
Video Guide: Graco Car Seat Installation – Rear-facing using LATCH
Graco Convertible Car Seat Installation
If you are contemplating which car seat may be best for you and your newborn in the longer term, these guides on how to choose a convertible car seat and types of car seats will be very helpful.
Among the Graco convertible car seats include the Extend2Fit®, and Contender™ 65, among others.
You can find all Graco car seat manuals for the convertible models on Graco car seat expiration.
Here are basic instructions for installing Graco convertible car seats in either rear-facing or forward-facing positions.
- The installed convertible car seat should not move more than 1 inch when pushed and pulled front-to-back or side-to-side.
- Use the top tether strap when installing in the forward-facing position.
- In rear-facing, harness straps should be at or just below the child’s shoulder.
- In forward-facing, harness straps should be at or just above the child’s shoulder.
- The car seat should be used for a child weighing 4-50 lbs. in rear-facing. A child weighing 4-22 lbs. and under 1 year MUST ride rear-facing.
- In forward-facing, the car seat should be used for a child weighing 22-65 lbs. and can sit upright unaided. A child weighing 50-65 lbs. MUST ride forward-facing.
- The car seat should not be installed using a LATCH system in rear-facing for a child weighing more than 45 lbs.
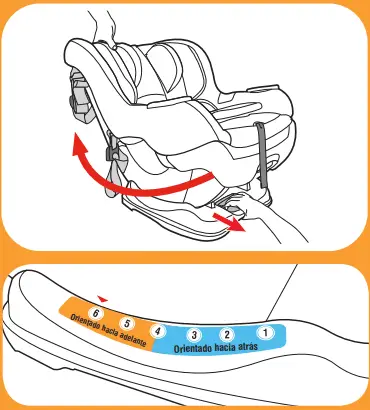
- You MUST use recline position 4 for a child weighing 22-40 lbs. in forward-facing mode.
- You MUST use recline position 5 or 6 for a child weighing over 40 lbs. in forward-facing mode.
Rear-facing Installation
The installation process is the same as the infant car seat installation in a rear-facing position. Please refer to the top of this page for rear-facing installation.
How to Install Graco Car Seat Forward Facing with 5-point Harness
Using LATCH in Forward-Facing
- Pull out the lower anchor straps from the storage compartment.
- Pass the lower anchor strap through the forward-facing belt path marked with an orange label.
- Unhook the tether strap from the storage location.
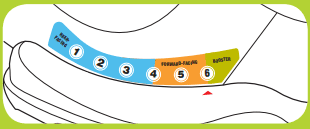
- Adjust the convertible car seat to the proper recline position: for children weighing 22-40 lbs., use recline position 4; for children weighing over 40 lbs., use recline position 5 or 6.
Video Guide: Graco Car Seat Installation – Forward Facing using LATCH
Using Vehicle Seat Belt in Forward-Facing
- Ensure the LATCH strap is stored back in the storage compartment.
- Adjust the car seat to the proper recline position: for children weighing 22-40 lbs., use recline position 4; for children weighing over 40 lbs., use recline position 5 or 6.
Video Guide: Graco Car Seat Installation – Forward Facing using Seat Belt
Graco All-in-One Car Seats Installation
Basic instructions to follow when installing Graco all-in-one car seats:
- Graco all-in-one car seat should be installed;
- in a rear-facing position for children weighing 4-50 lbs.
- In forward-facing position for children weighing 22-65 lbs., less than 49 in. in height.
- As booster seat for children weighing 40-100 lbs., height 43-57 in., and at least 4 years old.
- Children weighing less than 22 lbs. MUST ride rear-facing.
- The car seat can be installed using either the vehicle seat belt or the LATCH/LUAS/ISOFIX system. All are equally safe. You should use ONLY one method.
- In rear-facing, harness straps should be at or just below the child’s shoulder.
- In forward-facing, harness straps should be at or just above the child’s shoulder.
- You MUST use recline position 4 for a child weighing 22-40 lbs. in forward-facing mode.
- You MUST use recline position 5 or 6 for a child weighing over 40 lbs. in forward-facing mode.
- As a booster seat, you should use recline position 6.
- As a booster seat, never use the lap belt alone. Use the lap/shoulder belt.
- Graco car seats in booster mode can only be installed using the LATCH system if the vehicle manufacturer allows it. Otherwise, the booster seat MUST be installed with the vehicle lap/shoulder belt.
- The LATCH system can be used in booster mode regardless of the child’s weight up to 100 lbs.
All-in-One Car Seat Installation in Rear-facing and Forward-facing
The installation process is the same as the infant car seat installation in a rear-facing position and the convertible car seat installation in forward-facing. Please refer to earlier sections of this page for rear and forward-facing installations.
How to Install Graco Booster Seat
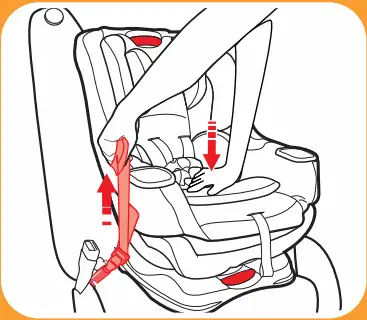
- Store the harness system.
- Place the car seat in a forward-facing position in the back seat of your vehicle.

Using LATCH
Only use if the lower anchor attachment DOES NOT interfere with any vehicle seat belts or buckles. If it does interfere, you should store the connectors and proceed to the vehicle seat belt installation.
- Unhook the tether from the storage compartment.
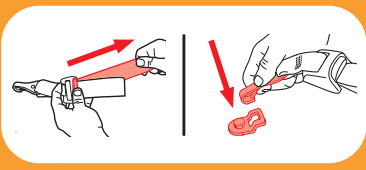
- Stretch out the lower anchor strap to full length.
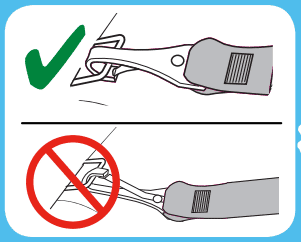
- Attach the InRight™ lower anchor connectors to the vehicle’s lower anchor bars and ensure the anchor strap is not twisted.
- Tighten the lower anchor strap and remove all the slack.
- Attach and tighten the tether and remove all the slack.
Using Lap/Shoulder Belt
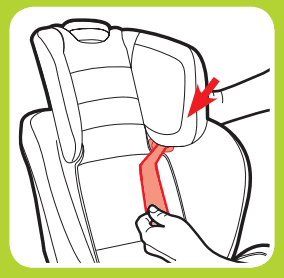
- Pass the vehicle shoulder belt through the seat belt path on the headrest.
How to Secure Your Child in Car Seat after Installation
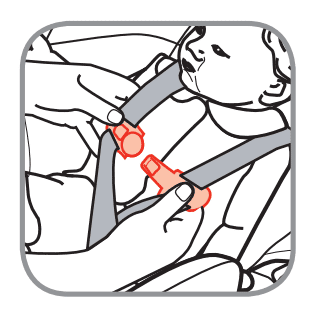
- Place the harness straps over your child’s shoulders
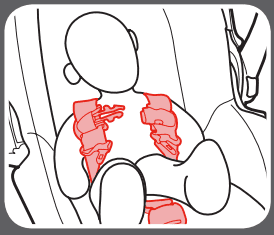
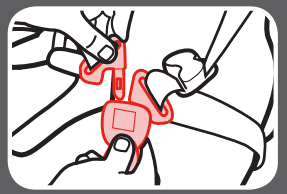
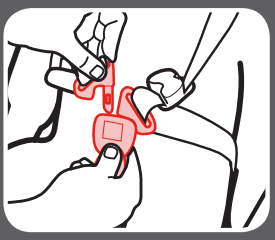
- Buckle the straps. You should hear a ‘click’ sound which means the buckle tongues are securely attached.
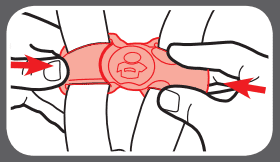
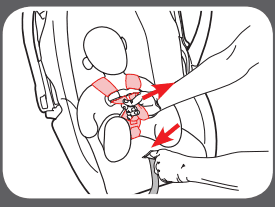
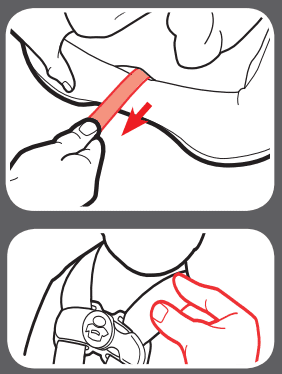
- Pull out all the slack from around the waist by pulling on the harness strap while pushing down the chest clip.
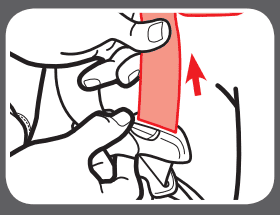
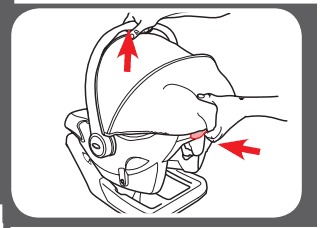
How to Remove Your Child From A Car Seat
- Loosen the harness straps by pushing down on the harness release lever while pulling out on the harness straps.