Diono Car Seat Installation
One of the joyous moments of motherhood is carrying your bundle of joy. Oh yes! Your baby!
And on the day you are to be discharged from the hospital, you’re expected to have an infant car seat for your baby’s first ride home and after that. And maybe you already read this on when to buy a car seat during pregnancy, now will be about time to learn how to install that car seat. Say you chose a Diono car seat; you’ll be learning about Diono car seat installation just about now.
The heavy lifting on searching and combining resources on how to install a car seat has been done for you. And right here, you will find all the guidance you need on Diono car seat installation, including Diono car seat manuals and other video guides.
And if it were other brands, then the following pages will guide you through;
Graco car seat installation, and
Safety 1st car seat installation
Basic Instructions Before Beginning Installation – All-in-One
- You should register your new car seat. Depending on which country you are in, here are registration links for USA and Canada;
- Diono registration in the U.S.: https://diono.com/product-registration/
- Diono registration in Canada: https://diono.ca/product-registration/
- All Diono car seats in the rear-facing position should only be used for children weighing 4-50 lbs. and height 18-44 in. depending on the model.
- In a forward-facing position, the car seat should only be used for children weighing 22-65 lbs. and height 30-57 in. depending on the model.
- The car seat should only be used for children weighing 40-120 lbs. and height 40-57 in. as a booster seat.
- Infants weighing less than 22 lbs. and under 1-year old MUST ride in a rear-facing car seat.
- Choose a safe spot (rear seat) in your vehicle to install the car seat. Never install a car seat in the front passenger seat with an activated airbag. NB: The middle rear is the safest spot for car seat installation.
- Determine which installation method you would use – LATCH/LUAS/ISOFIX system or the vehicle seat belt, NOT both.
- Ensure to install the car seat with either the LATCH system or the vehicle seat belt.
- The LATCH/LUAS/ISOFIX system should not be used when the car seat is used for a child weighing more than 35 lbs. in the rear-facing mode or weighing more than 40 lbs. in the forward-facing mode.
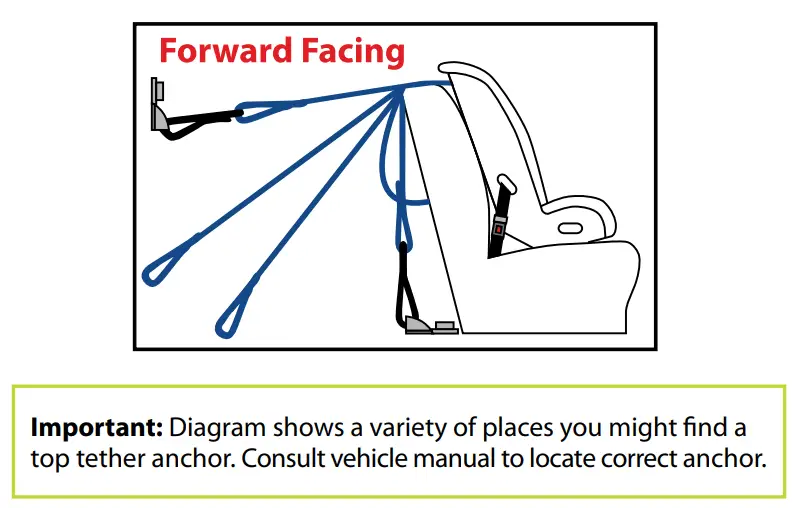
- The top tether strap must be used when installing the child seat in the forward-facing position.
10. Never leave your child unattended in the vehicle and the car seat. It can be illegal in some states’ car seat laws. On the other hand, children playing in or around a car seat can get tangled in the harness straps. - Always ensure the car seat is installed correctly you’re your child is well secured.
All Diono car seat models and manuals can be found on the Diono car seat expiration guide.
Diono Car Seat Installation with Base – Rear-facing Base Installation
While installing an infant car seat can go both ways, with base and without base, Diono requires that you ALWAYS use the base when installing in a rear-facing position. Do NOT use the car seat base when installing in forward-facing or booster mode.
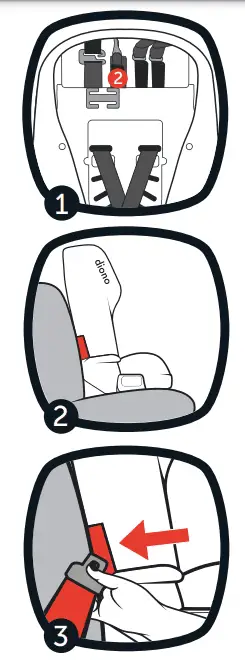
- Align the lower hooks.
Diono Car Seat Installation Rear-Facing
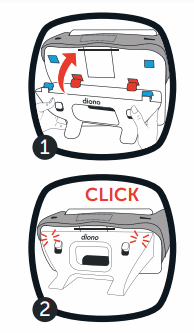
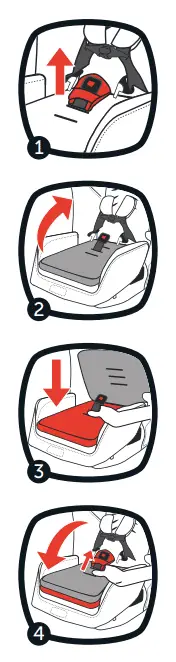
Now you are to begin your new Diono car seat installation. First things first, you are to set up your car seat by unfolding it.
That goes as follows:
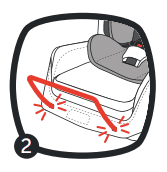
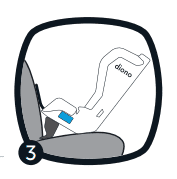
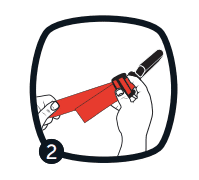
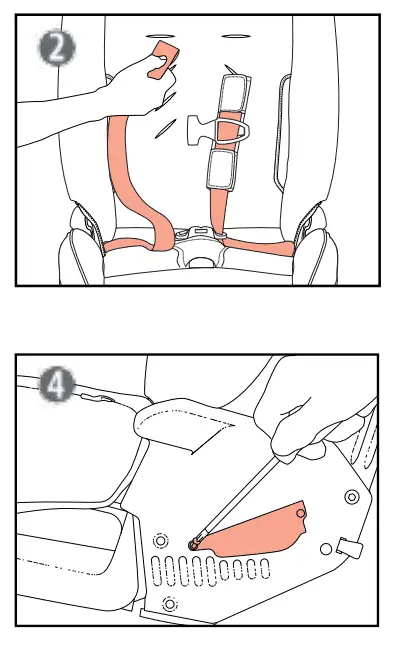
- Place the back of your car seat on a flat seat surface and unbuckle the red carry strap from the bottom.
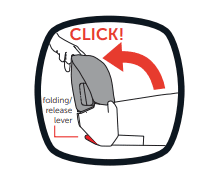
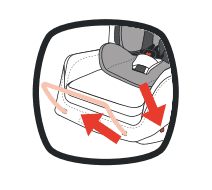
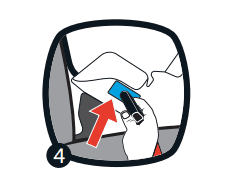
- Rotate the bottom of the car seat till you hear a ‘click’ sound. That confirms the car seat is locked and can now be installed.
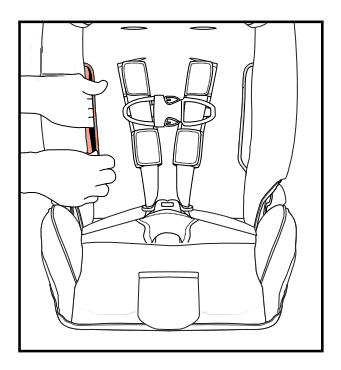
- Check that the harness straps are fully operational – the strap should tighten freely when the adjusting harness strap is pulled.
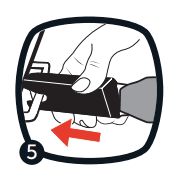
- Tuck the red strap through the harness slot and store it behind the seat cover.
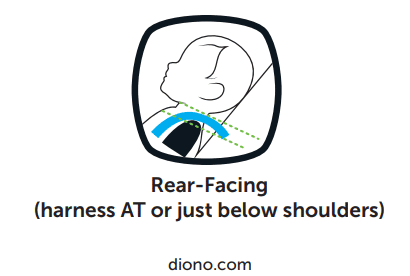
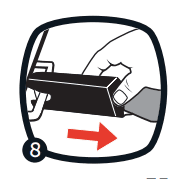
- To fold the car seat, push the lever (folding/release lever) and secure it with the red strap.
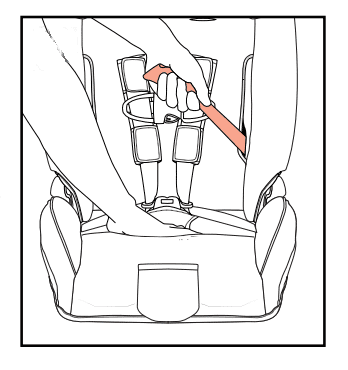
Harness Setup
- Place your child in the car seat – ensure their backrests against the car seat back.
- Place the harness straps over your child’s shoulders and legs and buckle. You should hear a ‘click’ sound which means the buckle is secured.
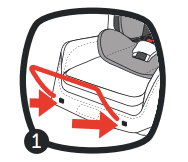
- Ensure the harness straps are in the correct position on your child. In the rear-facing position, the harness straps MUST be at or just below your child’s shoulders. The top of your child’s head must be 1.5 in. below the top of the car seat.

- The harness straps MUST be just above your child’s shoulders in a forward-facing position. The top of your child’s ear MUST be below the top of the car seat.


Installing the Anti-Rebound Bar
- Always install the anti-rebound bar when the car seat is installed in the rear-facing position. Do NOT use it in the forward-facing position.
- Place the anti-rebound bar into the anti-rebound bar slots on the front of the child seat.

- Push the anti-rebound bar into the slots. You should hear an audible ‘click’ sound. Pull the bar up to confirm it fits appropriately.
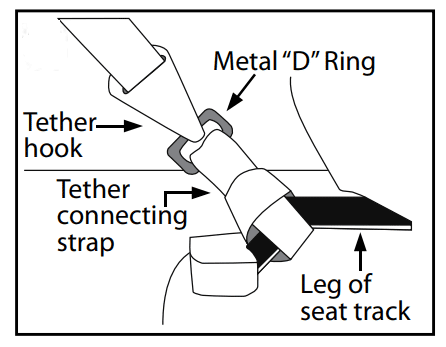
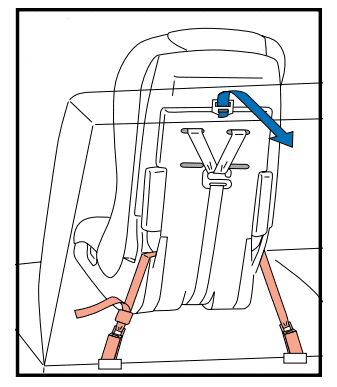
Diono Radian RXT Installation – Top Tether Installation in Rear-Facing
A tether is a part of a car seat designed to significantly reduce the movement of a car seat in rear-facing and forward-facing mode in a car crash.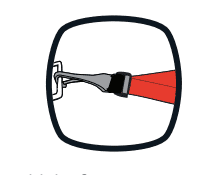
Note that tether connection locations in a car vary from vehicle to vehicle.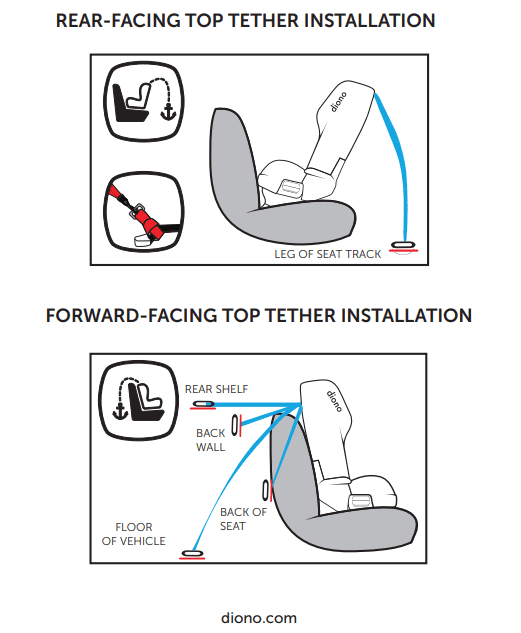
WARNING: Rear-facing top tether connector strap should ONLY be used when installed in the rear-facing mode and not otherwise.
Installation;
- locate the suitable tether connection track for the installation (either rear-facing or forward-facing).
- Wrap the connecting strap around the track and pull the strap to form a knot.
- Then, use the ‘D’ ring as an anchorage point for the top tether hook.

Rear-Facing Installations Using the Vehicle Seat Belt:
- Diono car seat in rear-facing position should only be used for children weighing 4-50 lbs. and height 18-44 in. depending on the model.
- Infants weighing less than 22 lbs. and under 1-year old MUST ride in the rear-facing position.
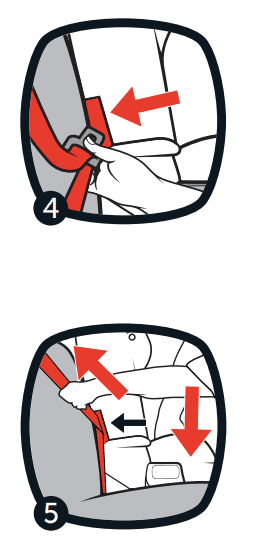
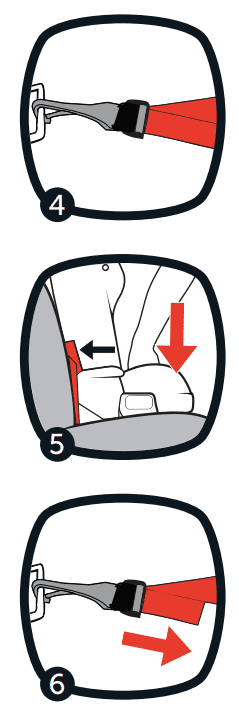
- Pass the seat belt through the rear-facing belt path marked with blue and buckle;

- Ensure the seat belt and the buckle socket are not twisted.
- To ensure the car seat is secured tightly, press onto the center of the seat and pull all the seat belt slacks till the belt is tight (the car seat should only move less than 1 inch when pushed front-to-back or side-to-side).
- Ensure the harness straps are in the correct position of your child’s shoulders.
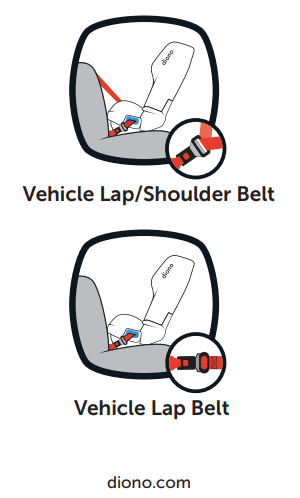
Rear-Facing Installations Using the Lap/Shoulder Belt with 5-Point Harness:
This installation method should be used for a child weighing 4-50 lbs.
- Place the car seat in a rear-facing position in the vehicle back seat with the car seat base already installed. The seat base bottom should be flat on the vehicle seat.
- Pass the seat belt through the rear-facing belt path and buckle it.
- Ensure the seat belt is not twisted. It should remain flat.
- To ensure the seat is secured tightly, press firmly into the center of the seat and pull all the seat belt slacks till the belt is tight (the car seat should only move less than 1 inch when pushed front-to-back or side-to-side).
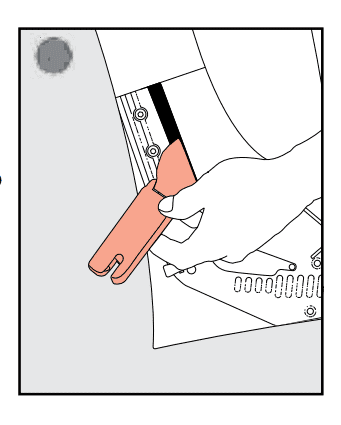
Rear-Facing Installations Using the LATCH/LUAS/ISOFIX System:
- The LATCH/LUAS/ISOFIX system should NOT be used when installing the car seat for a child weighing more than 35 lbs. Instead, use the vehicle seat belt for installation.
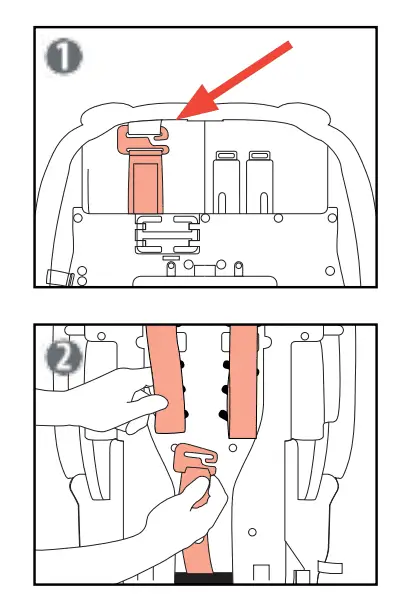
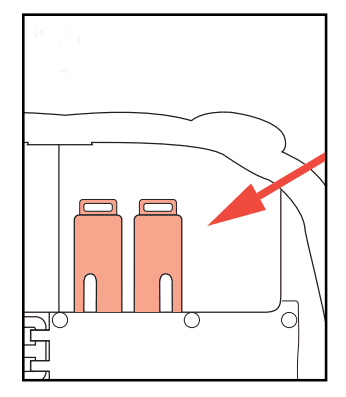
- Pull out the lower anchor connector straps from the storage compartment from the back of the car seat.
- Pull the straps to full length.
- Place the car seat in a rear-facing position in the vehicle back seat with the car seat base already installed. The seat base bottom should be flat on the vehicle seat.
- Ensure the installed car seat is centered between the LATCH/LUAS/ISOFIX anchors and that it sits flat on the vehicle seat.
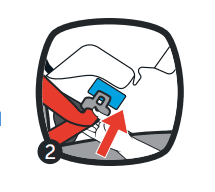
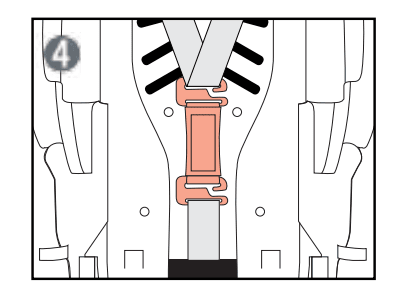
- Pass the anchor connector straps through the rear-facing belt path to the other side and buckle to the vehicle LATCH/LUAS/ISOFIX anchors. You should hear a ‘click’ sound.
- Ensure the strap is not twisted. It should remain flat.
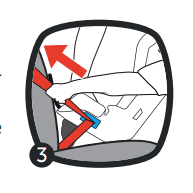
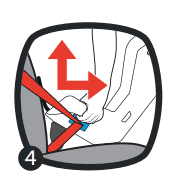
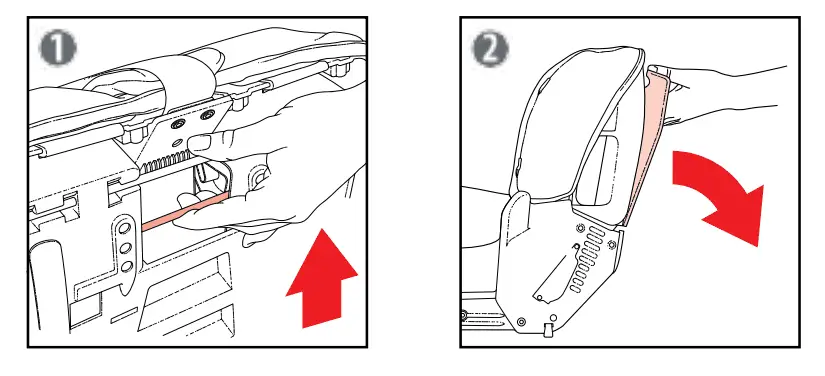
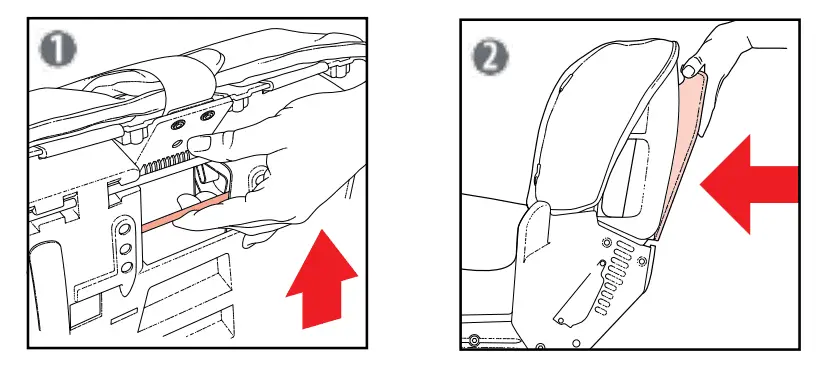
- To ensure the seat is secured tightly, press firmly into the center of the seat while tightening the LATCH/LUAS/ISOFIX anchor connector straps (the base should only move less than 1 inch when pushed front-to-back or side-to-side).
- [insert image: tighten the latch anchor straps] [insert image: tighten the latch anchor straps II]
- To remove the LATCH/LUAS/ISOFIX straps, use the release connectors and pull them from the anchor bars.
Diono Car Seat Installation Forward Facing
Basic Instructions Before Beginning Diono Car Seat Installation Forward Facing
- Diono requires that you install a car seat in the forward-facing position for a child weighing at least 22 lbs. and recommends that you use the rear-facing position until 2 years of age.
- You should ALWAYS use the top tether in forward-facing installation.
- For a child weighing under 40 lbs. the Diono SafeStop should be used in the forward-facing mode. The SafeStop should be removed once the child reaches 40 lbs.
- For a child weighing over 25 lbs. you should lower the adjustable bottom. The adjustable bottom should be used for forward-facing installations only.
- When only a lap belt is used for forward-facing installation without the top tether anchor point available, you MUST install the Diono Lap Belt Cushion.
SafeStop ®
Diono Safe Stop ® load limiting device is designed to absorb energy and reduce impact on a smaller child secured in a forward-facing car seat.
Always use the Safe Stop when installing a car seat in the forward-facing mode for a child under 40 lbs. (22-40 lbs.)
Do NOT use it in rear-facing installation and any other installation configuration.
Installation;
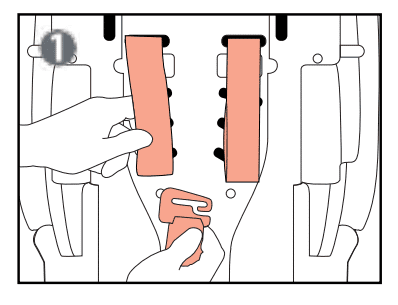
- Detach the SafeStop from the storage compartment located on the upper left backside of the car seat.
- Detach the harness straps from the metal hook of the harness adjuster strap.
- Then thread both straps into the metal hook of the SafeStop.
- Now thread the bottom of the SafeStop into the metal plate of the harness adjuster. Check to ensure the straps are not twisted.
Adjustable Bottom
The adjustable bottom of a Diono car seat MUST be lowered for children weighing over 25 lbs. in a forward-facing installation.
You should NOT adjust this bottom for children under 25 lbs.
The car seat must also be locked in its unfolded position before adjusting the bottom.
Installation – Lowering the Adjustable Bottom;
- Lift the bottom bar up and over the inner channel toward the seat bottom and release.
- Check to ensure the adjustable bottom is locked in the lowered position.
Installation – Raising the Adjustable Bottom;
- Lift the bottom bar up and over the inner channel away from the seat bottom and close securely.
- Check to ensure the adjustable bottom is locked in the closed position.
Diono Lap Belt Cushion Installation
The Lap Belt Cushion should ONLY be used for U.S. installations. Do NOT use it for Canada installations.
The Lap belt cushion should ONLY be used for forward-facing installation with harness using only the lap belt with NO top tether available—suitable child weight – 22-65 lbs.
Do NOT use it in rear-facing installation.
You MUST also use the 5th harness slot when using the cushion.
Installation (U.S. ONLY!);
- Remove the center buckle pad.
- Flip the memory foam pad upwards from the seat.
- Place the Diono lap belt cushion on the seat bottom and slide the buckle through the slot.
- Then flip down the memory foam pad and slide the buckle through the slot used on the seat. Now reinstall the center buckle pad.
Forward-Facing Top Tether Installation
- First, remove the top tether from the storage compartment behind the car seat before installing the car seat.
- Pull the top tether adjuster straps to full length
- Then attach the top tether to an anchor point in your vehicle using the hook at the end of the tether strap.
- Now install the car seat as shown;

- After installing the car seat, pull the adjuster strap to remove slacks and ensure it is tight.
Forward-Facing Installation Using the LATCH/LUAS/ISOFIX System
Diono car seat should not be installed for children weighing more than 40 lbs. in the forward-facing mode and only installed for a child weighing between 22 and 40 lbs.
Do NOT use the car seat base when installing in forward-facing mode
Installation;
- Pull out the lower anchor straps from the storage compartment on the back of the car seat by pressing the red release button, then pull the straps to full length.
- Also, pull out the top tether strap from the storage compartment from the back of the seat.
- Pass the anchor connector straps through the forward-facing belt path. Reach through the side panels of the car seat to easily access the belt path.
- Place the car seat in a forward-facing position and ensure the entire bottom is flat on the vehicle seat and the back of the car seat is also flat against the vehicle seat back. The car seat should be between the vehicle LATCH/LUAS/ISOFIX anchors.
- Now pass the top anchor strap to the appropriate anchor and connect (if available).
- Do not tighten yet till the car sear is installed.
- Now attach the anchor connector straps to the vehicle LATCH/LUAS/ISOFIX anchors. You should hear a ‘click’ sound to confirm they are connected. Ensure the strap is flat and not twisted.
- Now tighten the LATCH/LUAS/ISOFIX strap.
- To ensure the car seat is secured tightly, push down on the center of the seat and pull the strap tightly (the car seat should only move less than 1 inch when pushed front-to-back or side-to-side. Grab the side of the seat where the LATCH strap is with a hand and push).
- Tighten and remove any slack from the top tether strap by pushing the car seat backward while pulling and tightening the strap.
Video guide:
Forward-Facing Installation Using the Lap/Shoulder Belt With 5-Point Harness:
Diono car seat in forward-facing mode with 5-point harness should only be used for children weighing 22-65 lbs.
- Unhook and pull out the top tether from the storage compartment on the back of the car seat.
- Place the car seat in a forward-facing position in the back seat and ensure the entire bottom is flat on the vehicle seat and the back of the car seat also is flat against the vehicle seatback.
- Loosely attach the top anchor strap to the appropriate anchor and connect (if available), but don’t tighten.

- Pass the vehicle seat belt through the forward-facing belt path to the other side and buckle. Ensure the seat belt and the buckle socket are not twisted.
- To ensure the car seat is secured tightly, press firmly onto the center of the seat and pull all the seat belt slacks till the belt is tight (the car seat should only move less than 1 inch when pushed front-to-back or side-to-side).
- Tighten and remove any slack from the top tether strap by pushing the car seat backward while pulling and tightening the strap.
Video guide:
Install Using Lap Belt With 5-Point Harness:
Install for a child weighing 22–65 lb
- Unhook and pull out the top tether from the storage on the back of the car seat.
- Place the car seat in a forward-facing position in the back seat and ensure the entire bottom is flat on the vehicle seat and the back of the car seat is also flat against the vehicle seatback.
- Pass the vehicle seat belt through the forward-facing belt path to the other side and buckle it. Ensure the seat belt and the buckle socket are not twisted.
- Loosely attach the top anchor strap to the appropriate anchor and connect (if available), but don’t tighten.
- Tighten the vehicle seat belt. To ensure the car seat is well secured, press firmly onto the center of the seat and pull all the seat belt slacks till the belt is tight (the car seat should only move less than 1 inch when pushed front-to-back or side-to-side).
- Tighten and remove any slack from the top tether strap by pushing the car seat backward while pulling and tightening the strap.

Diono Car Seat Booster Installation
Basic Instructions Before Beginning Diono Car Seat Booster Installation
- Diono Booster Car Seats should ONLY be installed in the Booster mode for a child weighing between 40-120 lbs. and height between 38-63 in.
- Diono All-In-One Car Seats should NOT be installed in the Booster mode for a child weighing less than 50 lbs. and under 40 in. height and if the child’s shoulders are below the 4th harness position. Please refer to your car seat model manual for specificity.
- Please refer to your car seat model manual. All Diono car seat models and manuals can be found on the Diono car seat expiration
- Harness straps and buckles should be removed when installed in booster mode.
- Do NOT install a booster seat with only a lap
- Install a booster seat ONLY with a lap-shoulder seat belt.
- Do NOT install a booster seat without the backrest unless the vehicle seat has a headrest in the seating position.
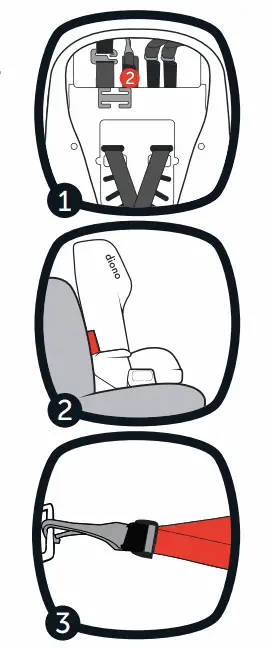
Removing the Harness
If you are converting an all-in-one car seat to a booster seat, you will need to remove the 5-point harness and the crotch bottom.
- Remove the harness straps from the metal hook on the back of the car seat.
- Pull out the harness straps from the back of the car seat. And then remove the harness pads and chest clip from each side.
- Slide-out the harness straps from the metal tongues.
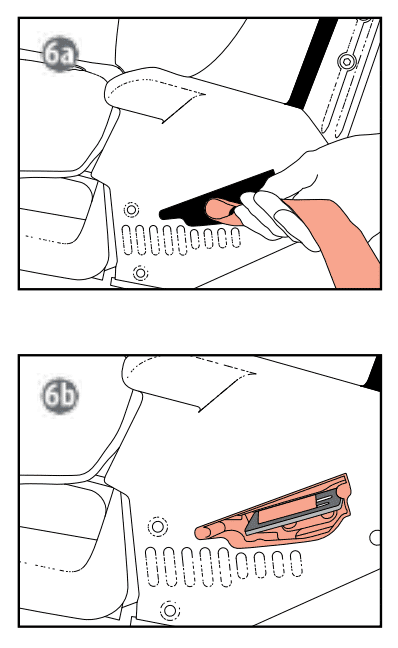
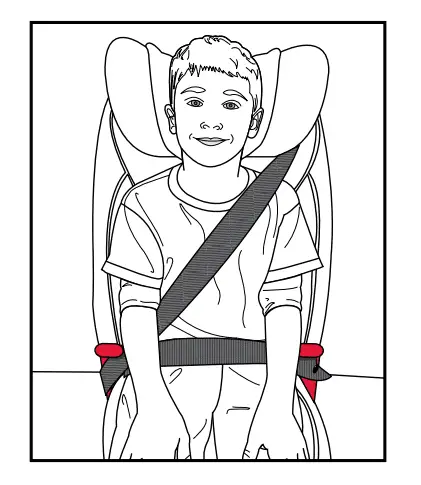
- Use a Phillips head screwdriver to take out the screws and remove the access panels on both sides of the car seat bottom.
- Remove the harness straps from the seat.
Replacing the Harness
- Insert a new harness strap through the slot in the metal frame and pull the strap till the D-metal ring is inside the cavity.

- Re-fasten the access panels with the screws.
- Slide the new shoulder harness straps through the metal buckle tongues, re-attach the chest clip and reinstall the harness pads.
Diono Booster Seat Installation
- Remove the harness and then the crotch buckle.
- Place the car seat in a forward-facing position in the back seat and ensure the entire bottom is flat on the vehicle seat and the back of the car seat is also flat against the vehicle seat back.
- If available, secure the booster seat with the top tether. This provides additional secure installation, keeping the seat secure when not occupied.
- Let your child sit in the car seat with their back flat against the back of the booster seat.
- Fasten the lap-shoulder belt across your child. The lap portion of the belt should lie within the lower belt guides and the buckle located on the outside of the booster seat.
- Place the shoulder belt part in a way that the belt rests properly across your child’s collarbone, towards the inner shoulder.
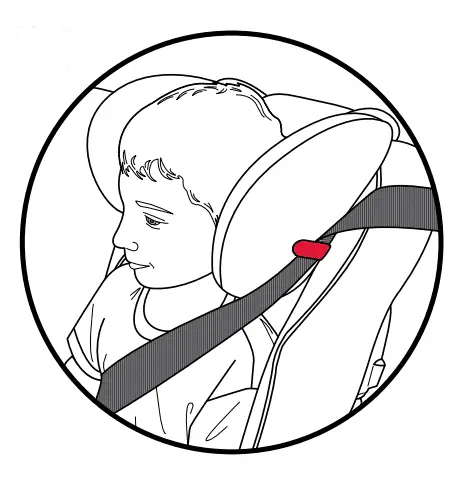
- Check and ensure the seat belt is not twisted. Also, remove any slack.
Video guide:
https://www.youtube.com/watch?v=nEI0Uoswb4I
Diono Car Seat Maintenance and Care
Removing the Car Seat Cover – How to Remove Diono Car Seat Cover for Cleaning
- Remove the harness straps from the harness hook.
- Remove the headrest cover by pulling the tabs at the center of the headrest.
- Remove the elastic loops from the hooks.
- Pull out the edges of the seat cover from the channel along the top and side of the car seat.