Installing your new Safety 1st car seat just got easy with this comprehensive guide.
While you may be preparing to buy your car seat while pregnant, learning how to install it is the next. Safety 1st car seat installation is pretty straightforward, and there are videos to guide you further.
On the other hand, there are more guides for other car seat brands;
Evenflo car seat installation;
Also, you can find every Safety 1st car seat manual on the Safety 1st car seat expiration page.
Safety first car seat models include infant seats, convertibles, and all-in-one car seats that can be used in rear-facing, forward-facing, and booster seats.
Basic Instructions Before Beginning Safety 1st Car Seat Installation – Infant Seats
- You should register your new car seat so you can be reached in the event of a recall. You can register online at https://www.safety1st.com/registration/
- Safety 1st infant car seats, the onBoard™ 35 Infant Car Seat series, are to be used for a child weighing 4-35 lbs. and whose height is less than 32 in.
- Safety first onBoard™ 35 LT infant seats should ONLY be used with a compatible onBoard™ 35 LT base.
Safety 1st Car Seat Base
How to Install and Remove the Infant Car Seat to the Base
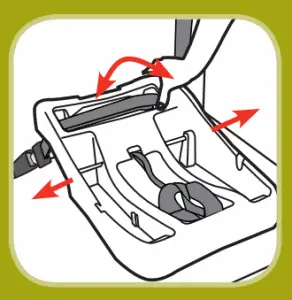
To remove the Safety 1st infant car seat from the base;
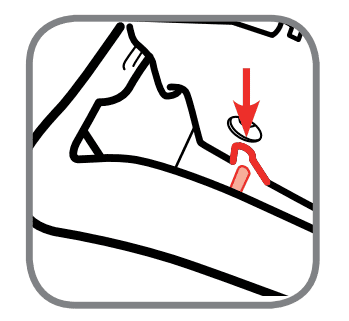
- Slide up the base release handle from the back of the infant seat and lift the seat out of the base.

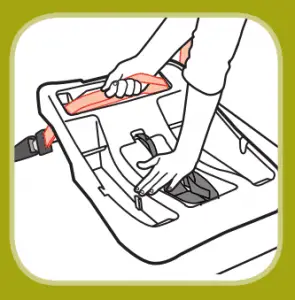
To attach the Safety 1st infant car seat to the base;
- Make sure to align the slots on the side of the infant seat with the lock bars in the seat base.
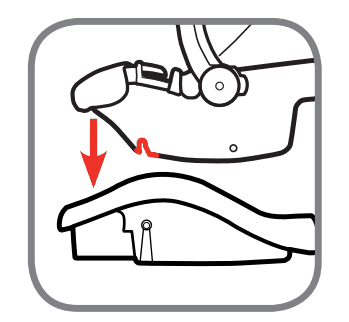
- Then push down the infant seat firmly from the carry handle and the front of the infant seat to lock it down to the base. You should hear a ‘click’ sound confirming it is locked.
- Now pull up the infant seat on the front two corners to ensure the seat is locked to the base.
Safety 1st Car Seat Base Installation (with LATCH and Lap/Shoulder Belt)
Installing Safety 1st Car Seat Base with LATCH/LUAS/ISOFIX;
- Do not use the LATCH/LUAS/ISOFIX system with the vehicle’s lap/shoulder or lap belt.
- Always check the LATCH/LUAS/ISOFIX straps before each use. Don’t use it if it can’t be tightened properly and securely.
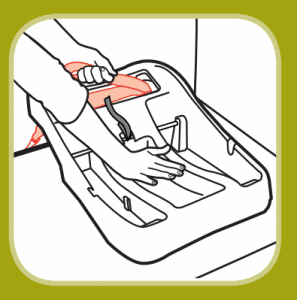
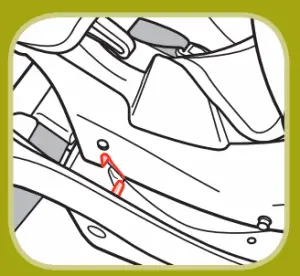
- Place the Safety 1st car seat base between the vehicle seat anchors in a rear-facing position.
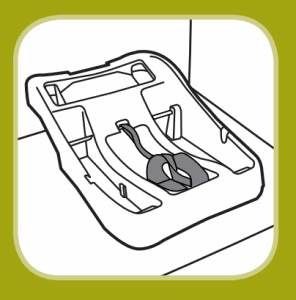
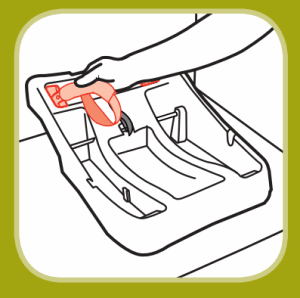
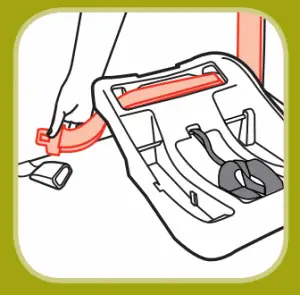
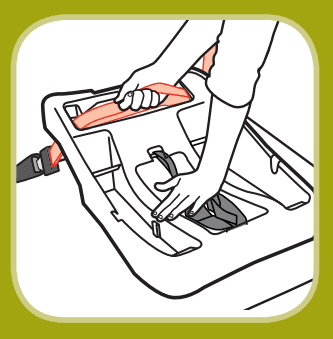
- Pull out the anchor connector straps from the storage on the base and stretch out to full length.
![connector straps from storage]](https://parentingwithhumility.com/wp-content/uploads/2022/04/connector-straps-from-storage-300x300.png)
- Pass the anchor straps through the base belt path openings.
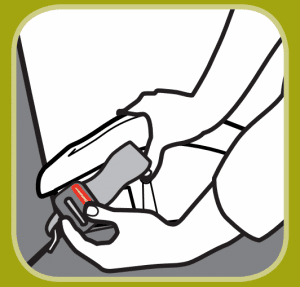
- Attach the strap hooks to the vehicle LATCH/LUAS/ISOFIX anchors and tighten the straps.

- To ensure the car seat base is secured tightly, press firmly into the center of the base and pull all the belt slacks till the belt is tight (the car seat should only move less than 1 inch when pushed front-to-back or side-to-side).
- Tuck back in any loose end of the belt into the belt path hole.
- Attach the infant seat to the base.
How to Remove the LATCH/LUAS/ISOFIX Belt from Vehicle Anchor;
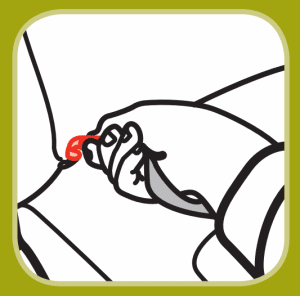
- Remove the tension from the lower anchor belt by pushing down on the side of the seat base where the lower anchor belt adjuster is. Then press the adjuster button to loosen the belt.
- Unhook the belt from the anchor by squeezing the spring lever on the hook. Then push the hook back into the seat bight and twist. Now pull out the hook from the vehicle seat
Safety 1st Car Seat Base Installation with Vehicle Seat Belts;
- Do not use the LATCH/LUAS/ISOFIX system with the vehicle lap/shoulder or lap belt.
- Ensure to store the LATCH/LUAS/ISOFIX connector straps when using the vehicle seat belts.
- Place the Safety 1st car seat base on the vehicle seat in a rear-facing position.
- Pass the vehicle lap or lap/shoulder belt through the base belt path openings, buckle and then tighten the belt.
- To ensure the car seat base is secured tightly, push down firmly into the center of the base and pull up all the seat belt slacks until the belt is tight (the car seat should only move less than 1 inch when pushed front-to-back side-to-side).
- Attach the infant seat to the base.
Video guide: Safety 1st Car Seat Installation With Base – Rear-Facing using LATCH
Video guide: Safety 1st Car Seat Installation With Base – Rear-Facing Using Seat Belt
Safety 1st Car Seat Installation Without Base – Rear Facing
A car seat can be installed without base, and here, you will learn how to install safety 1st car seat without base using the lap belt or lap/shoulder belt.
With Vehicle Seat Belts;
- Do not use the LATCH/LUAS/ISOFIX system with the vehicle’s lap/shoulder or lap belt.
- Always check the vehicle belt straps before each use. Don’t use it if it can’t be tightened properly and securely.
- Secure your child properly in the safety seat.
- Place the Safety 1st infant car seat on the vehicle seat in a rear-facing position.
- Remember, the center rear is the safest place to install a car seat, but the rear seat generally is safer than the front passenger seat.
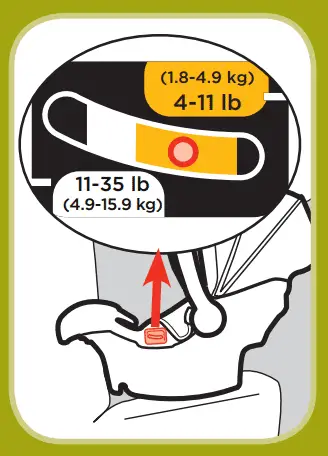
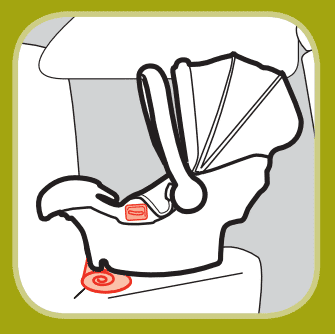
- Check the angle indicator on the infant seat while the vehicle is parked on a level surface. The ball should be in the zone that corresponds with your child’s weight.
- Pass the vehicle lap or lap/shoulder belt through the base belt path, buckle and tighten the belt. Feed the excess slack back into the retractor while tightening.
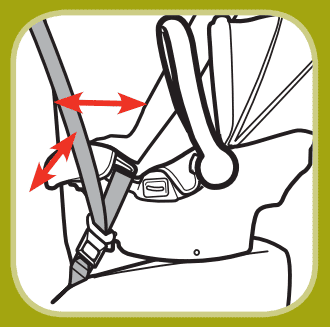
- To ensure the infant car seat is secured tightly, grasp the infant seat at the belt path with one hand, push and pull up all the seat belt slacks till the belt is tight (the car seat should only move less than 1 inch when pushed front-to-back or side-to-side).
- Recheck the angle indicator. The ball should remain in the zone corresponding to your child’s weight.
- If the underneath of the car seat base is not balanced, you may need to place a large rolled towel.
Safety First Convertible Car Seat Installation and All-In-One Installation
This section will cover safety 1st car seat installation for convertibles and all-in-one car seats.
Safety 1st Car Seat Installation Rear Facing
- In rear-facing mode, the weight and height requirements are 5-40 lbs. and 19-40 in., respectively.
- Installation can be done with the LATCH/LUAS/ISOFIX system, lap belt, or lap/shoulder belt.
- Do not use the LATCH/LUAS/ISOFIX system along with the vehicle lap/shoulder or lap belt.
with LATCH/LUAS/ISOFIX system;
- Pull out the lower anchor connector from the storage compartment.
- Pass the lower anchor connector through the rear-facing belt path and pull out on the other side. Do not twist the belt.
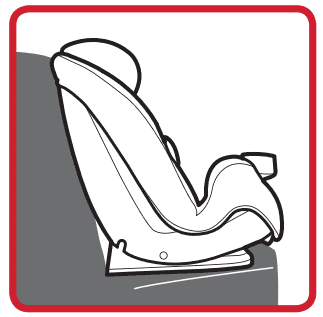
- Recline the child car seat by pulling out the recline handle and pushing the top of the child seat backwards.
- Place the child’s car seat in the vehicle’s back seat in the rear-facing position.
- Attach the lower anchor hooks to the vehicle’s lower anchors and tighten the belt.
- To ensure the car seat is secured tightly, push down firmly into the center of the seat and pull up all the anchor belt slacks till the belt is tight (the car seat should only move less than 1 inch when pushed front-to-back or side-to-side).
with vehicle belt (lap or lap/shoulder belt);
- Recline the car seat by pulling out the recline handle and pushing the top of the child seat backwards.
- Place the car seat in the vehicle’s back seat in a rear-facing position.
- Pass the vehicle lap or lap/shoulder belt through the rear-facing belt path and pull out on the other side, buckle and tighten the belt. Do not twist the belt.
- To ensure the car seat is secured tightly, grasp the car seat at the belt path with your ‘weakest’ hand, push and pull up all the seat belt slacks till the belt is tight (the car seat should only move less than 1 inch when pushed and pulled front-to-back or side-to-side).
Safety 1st Car Seat Installation Forward-Facing
- In forward-facing mode, the weight and height requirements are 22-65 lbs. and 29-49 in., respectively. The Grand 2-in-1 Booster seat is 30-65 lbs. and 32-49 in.
- Installation can be done with the LATCH/LUAS/ISOFIX system with tether, lap belt with tether, or lap/shoulder belt with tether.
- Do not use the LATCH/LUAS/ISOFIX system with the vehicle lap/shoulder or lap belt.
- Do not use fasten multiple tether hooks to the same tether anchor in the vehicle.
- You MUST always attach, adjust, and secure the top tether strap when installing a safety 1st car seat in forward-facing mode and with internal harness.
- If the seating position you choose doesn’t have a tether anchor, change to a different seating position that has a tether anchor.
With LATCH/LUAS/ISOFIX system;
- Pull out the lower anchor connector from the storage compartment.
- Pass the lower anchor connector through the forward-facing belt path and pull out on the other side. Do not twist the belt.
- Place the car seat in the vehicle’s back seat in the forward-facing position. Ensure the back of the car seat rests against the vehicle seat.
- Loosely attach the top tether hook to the vehicle’s top tether anchor. Check with your vehicle owner’s manual for specific tether locations for your car.
- Attach the lower anchor hooks to the vehicle’s lower anchors and tighten the belt.
- To ensure the car seat is secured tightly, push down firmly into the center of the seat and pull up the free end of the anchor belt till it is tight (the car seat should only move less than 1 inch when pushed front-to-back or side-to-side).
Video Guide: Forward-Facing Installation With LATCH/LUAS/ISOFIX
With vehicle belt (lap or lap/shoulder belt);
- Place the car seat in the vehicle’s back seat in the forward-facing position. Ensure the back of the car seat rests against the vehicle seat.
- Loosely attach the top tether hook to the vehicle’s top tether anchor. Check with your vehicle owner’s manual for specific tether locations for your car.
- Pass the vehicle lap or lap/shoulder belt through the forward-facing belt path to the other side, buckle and tighten the belt. Do not twist the belt.
- To ensure the car seat is secured tightly, firmly push down the seat while pulling the shoulder belt or the free end of the lap belt to tighten. Also, push back the seat and pull the top tether strap to remove all slack and create tension on the strap.
- Hold the car seat at the belt path with your ‘weakest’ hand and push and pull to ensure tightness. The car seat should only move less than 1 inch when pushed and pulled front-to-back or side-to-side).
Video Guide: Forward-Facing Installation With Seat Belt and Top Tether
Safety 1st Booster Seat Installation
Basic Instructions Before Beginning Installation – Booster Seats
- The weight and height requirements in booster seat mode are 40-100 lbs. and 43-52 in., respectively. A Grand 2-in-1 Booster seat allows up to 120 lbs. and 57 in.
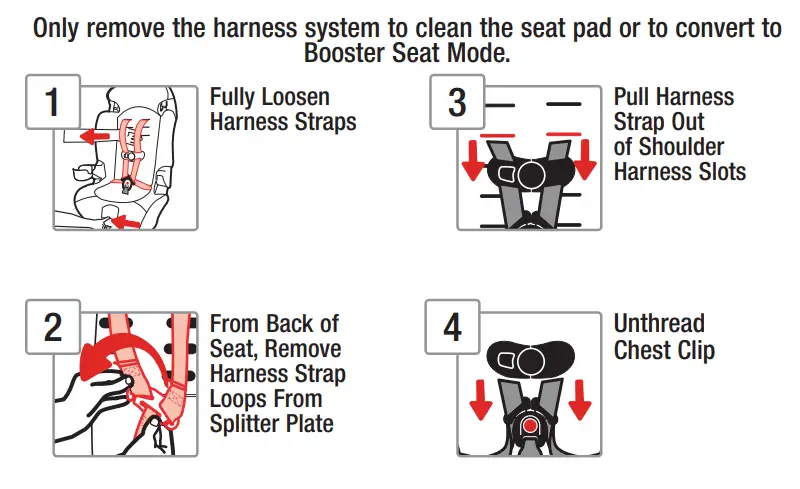
- You MUST remove the harness system and the accessories and store them before installing in the booster seat mode.
- Do not use a booster seat if the top of your child’s ears are above the top of the booster seat’s headrest.
- Use only the vehicle’s lap and shoulder belt system in booster seat mode. Do NOT use only the lap belt.
- Do not use the LATCH/LUAS/ISOFIX system when installing as a booster seat. Also, secure the lower anchor connector and top tether strap in their storage compartments.
Installation with vehicle belt (lap and shoulder belt);
- Place the booster seat in the vehicle’s back seat in the forward-facing position. Ensure the back of the booster seat rests against the vehicle seat.
- Put your child in the booster seat. The top of their ear should never be above the top of the headrest. Adjust the headrest if necessary.
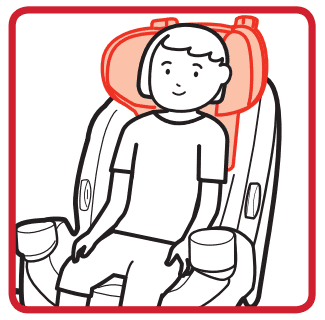
- Position the lap belt portion on your child through the booster belt path. The belt should lay snugly across their upper thigh and not on the stomach.
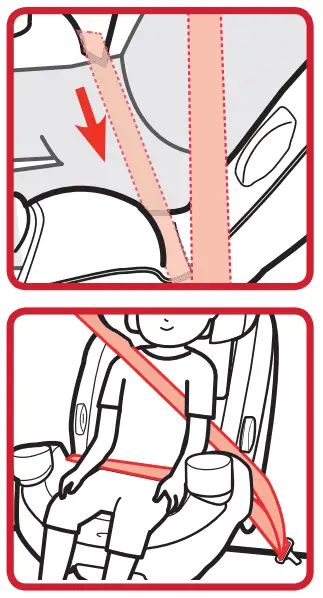
- Buckle the vehicle belt.

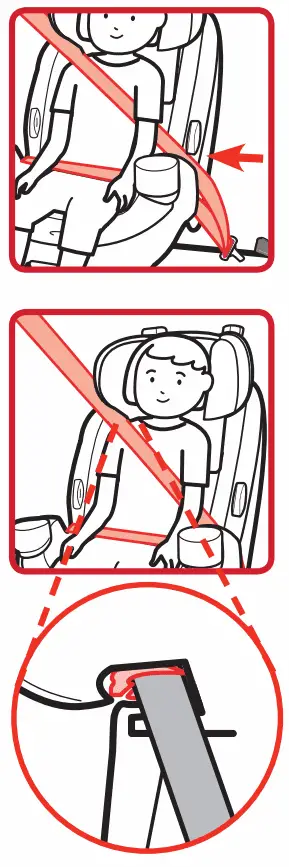
- Position the shoulder belt portion on your child through the under of the easy-out harness holder. The belt should lay snugly across the center of their shoulder and across the chest and not on their face or neck.
Video Guide: Converting To Booster Seat
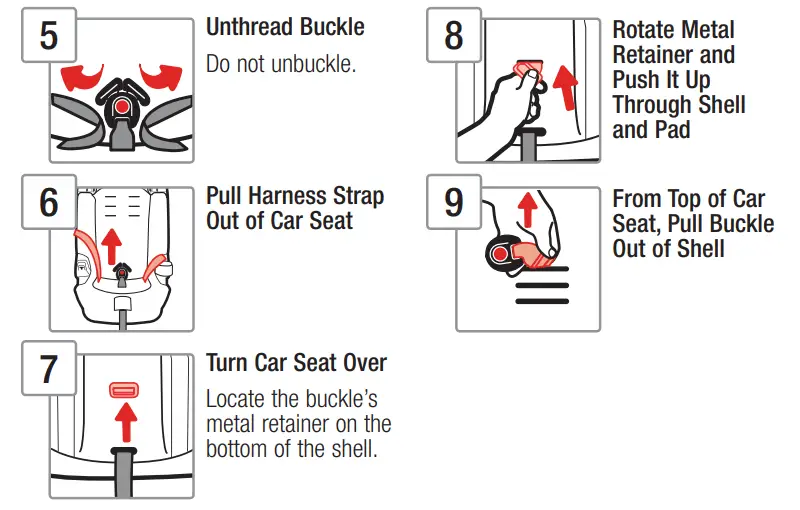
Removing the Harness System
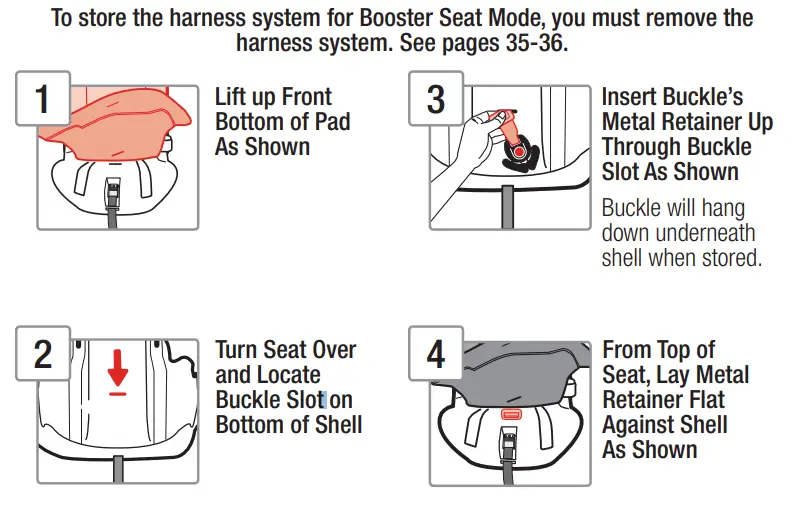
Storing the Harness System

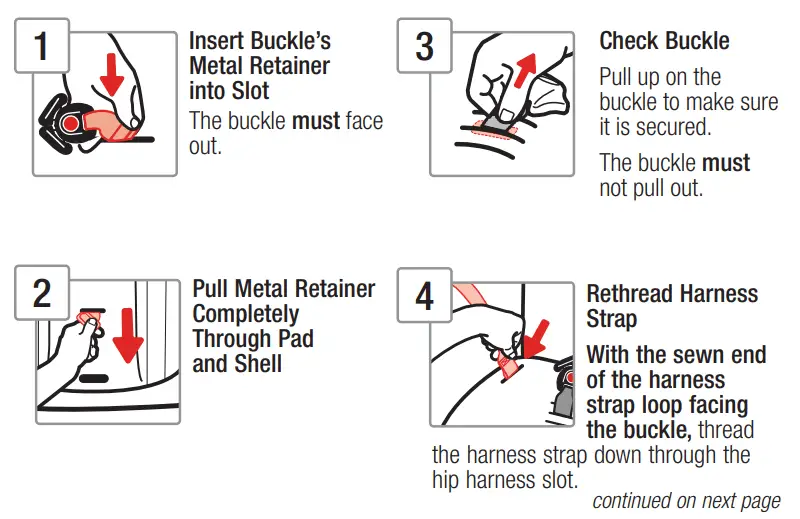
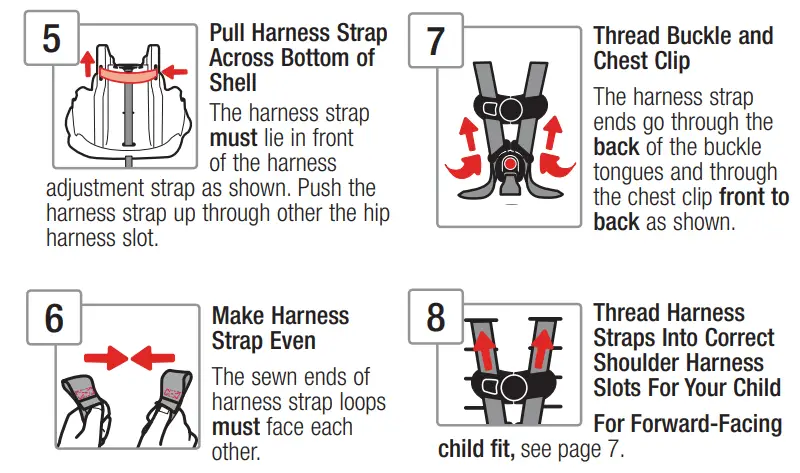
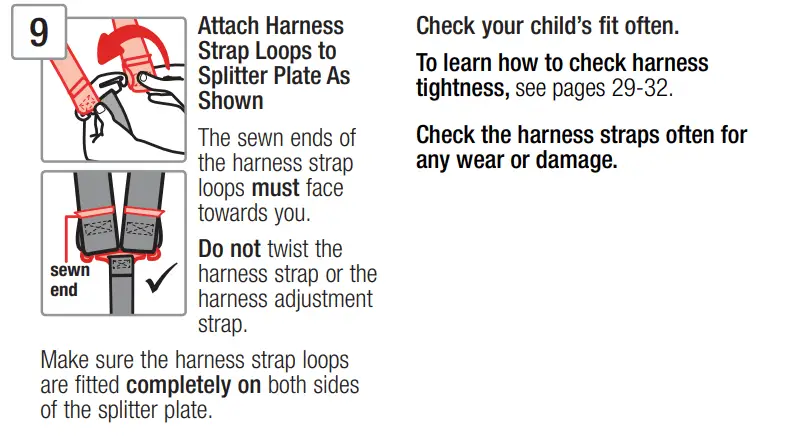
Installing the Harness System
Securing Your Child After Car Seat Installation
- Place your child in the installed car seat.
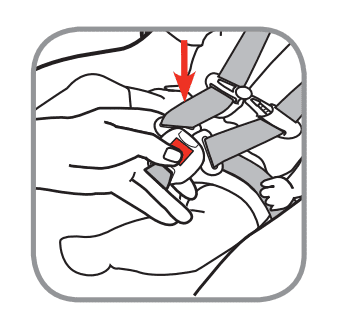
- Buckle the harness. You should hear a ‘click’ sound.
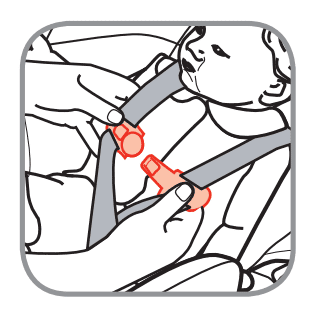
- Close the chest clip by inserting half of the chest clip into the second half and snapping together.
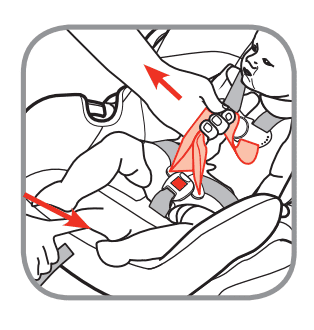
- Then tighten the harness by pulling on the harness adjustment strap.
- Position the chest clip at the mid-chest of your child and away from their neck.
- Check and ensure that the harness is tight
Removing Your Child from the Car Seat
- Loosen the Harness: push down the harness release lever while pulling out the harness.
- Release the chest clip by pressing on the chest clip release button and pulling it apart.
- Unbuckle the harness by pressing the red button and pulling the buckle tongues out.
- Place the harness straps to the side, out of the way, and carry out your child.